How would you like a detailed analysis of your email marketing performance? Would you like to see how many subscribers you lost or gained over time? Or maybe you want to compare your open rates from month to month?
Email marketing has become an essential part of any successful business strategy. You might miss valuable insights if you don’t understand your email marketing performance well.
MailChimp offers a powerful report tool to analyze your data easily. This article will show you how to create a MailChimp report.
What is a MailChimp report?
You can find information about your campaigns, website, audience, and more in your Mailchimp account.
Mailchimp compiles this information into several reports that offer insightful analysis to guide your subsequent actions and marketing plan.
Mailchimp reports help you understand your audience, what’s working with your marketing, and where your revenue comes from.
Before we take you through how to create a Mailchimp report, you’ll need to know the types of Mailchimp reports, the kinds of information they provide, and how important they are.
Check out our free templates gallery
Types of Mailchimp Reports
There are various categories of reports available on Mailchimp. These reports offer insights on metrics like your audience, campaigns, engagements, purchases, and website data.
This section will take you through everything you need to know about Mailchimp report types.
Mailchimp basic reports
Mailchimp basic reports are the standard set of reports available on all plans. You’ll need to upgrade to the Essentials plan to get the Customer journey reports. Some of the basic reports Mailchimp offers include:
- Audience dashboard
- Campaign and Campaign engagement reports
- Purchase behavior reports
- Website reports
- Customer journey reports
Mailchimp comparative reports
Comparative Reports combines data from your sent Regular and RSS campaigns into a thorough, shareable report.
You can select any number of campaigns to compare to assist you in identifying subscriber engagement patterns and enhancing and targeting your campaign content.
To track overall campaign activity in a series of Snapshots, you can create the same Comparative Report over time by saving the specific parameters you set in each report.
Your report will be updated to include information from the new campaigns if you send additional campaigns to your audience that fit the specified parameter.
You can generate campaign Snapshots manually as often as you want or schedule them to generate at a regular interval (daily or weekly). You can also share or export your Snapshots.
Mailchimp campaign reports
If you enable tracking in your email campaign, Mailchimp will collect and analyze data on opens, clicks, purchases, social activity, and other interactions after you send.
You can see this data in your email campaign report. Here are the metrics you’ll see in your overview:
- Recipients
- Audience
- Subject
- Delivered
- Orders
- Average order revenue
- Total order revenue
- Click Performance
- Campaign benchmarking
- Open rate
- Click rate
- Opened
- Clicked
- Bounced
- Unsubscribed
- Total opens
- Successful Deliveries
- Clicks per unique opens
- Total clicks
- Forwarded
- Forwarded opens
- Abuse reports
- Last Opened
- Last clicked
- 24-hour performance
- Subscribers with most opens
- Social performance
- Top locations
Sample Mailchimp email report
Despite additions to Mailchimp’s portfolios, like landing pages and postcards, Mailchimp continues as an essential business component.
Most people use Mailchimp campaigns to check how their email performs. Email reports refer to a specific campaign delivered from Mailchimp, such as emails about the latest products and sales messages.
Automation reports also use email, which will be covered further in this post’s Mailchimp Automation Reports section. A typical email report starts with:
- Number of recipients
- Audience
- Data and time when Mailchimp delivered a campaign
- Subject line
It also includes stats on emails opened, bounced, clicked, and those that led to unsubscribing recipients. Many related stats are available such as successful deliveries, total opens, clicks per unique opens, and more.
Mailchimp automation reports
The difference between a classic automation report and a regular campaign report is that the first includes complete automation and individual email statistics.
To view a classic automation report, go to Campaigns > Reports > Automations. > View Report.
The report will display overall statistics for the classic automation. Statistics include Subscribers who’ve completed, delayed, status, queue, and emails sent.
As the chart is designed to show month-to-month performance, the automation needs to be active for at least a month before the chart is populated with data.
Mailchimp bounce reports
Bounce refers to emails that weren’t delivered to the recipient; the more emails you send, the higher chances of receiving a bounce message.
Head to Campaigns > Reports > View report to view the reasons for a bounce. Then click the link for the number of Bounced emails for a campaign.
On the Bounced page, you can view the Bounce Reason for each bounced address to investigate. You may have to scroll to the right to view the link if you have a lot of fields in your audience.
When you click the Bounce Reason link, a report for the address that explains why the email bounced will show up in a new browser tab.
Mailchimp audience reports
You can better understand your audience’s behavior with the audience report.
Instead of looking for particular campaigns or email messages, audience reports examine all of your subscribers’ previous interactions with an audience specific to the email digital marketing purposes.
Although Mailchimp doesn’t tag them as reports within the website, the interface looks pretty the same. They’re located in Audiences > Audience dashboard and can be downloaded.
The stats overview page displays the following:
- Audience growth
- Audience performance
- Contacts by type
- Top email clients
- Since last campaign
- Campaign performance
- Top locations
Mailchimp custom reports
Mailchimp can offer different reports, but it may make more sense to you. If so, consider implementing customized reporting outside of Mailchimp.
Although analytic skills are helpful, most professionals do not require them to be experts. It means anybody can easily upload Mailchimp data directly into a destination like Data Studio for quick reporting.
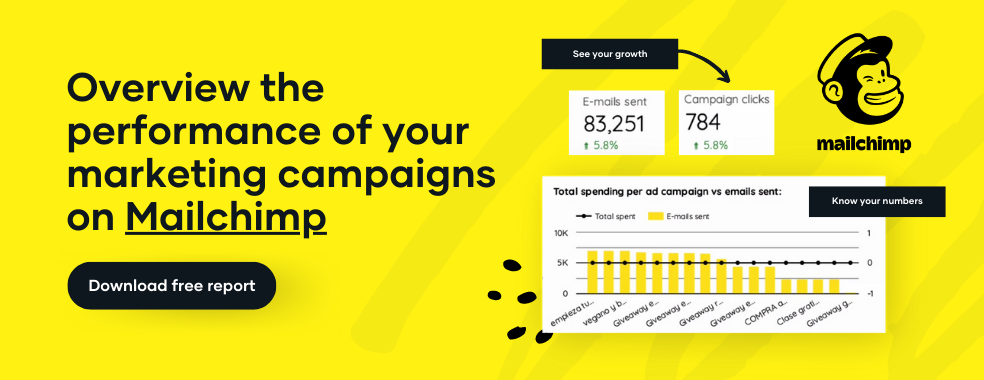
We will explain this in detail with Porter Metrics — a tool built for marketers who don’t code but need to analyze marketing data and create reports.
Mailchimp monthly report
You can pull audience stats, campaign stats, lists of contacts, automation with their individual stats, and more from Mailchimp monthly.
These data can provide an excellent base for a handy, self-updating dashboard.
You can quickly implement this with the Porter Metrics Mailchimp report template and the date range control in Google Data Studio.
Mailchimp weekly email reports
Weekly reports generally make more sense and offer more insight than daily ones. Weekly email updates are convenient so you can report on your progress or attend the weekly meeting with the latest information.
You can also use the Porter Metrics Mailchimp report template and the date range control in Data Studio to create weekly reports.
Key Mailchimp KPIs to Track
How would you measure how effective your email marketing campaigns are? KPIs will help track all the progress of your campaigns so you can make the appropriate decisions best for your business.
Here, we’ll take you through some of the most vital Mailchimp KPIs to track.
Campaign performance
This KPI includes a list of the most clicked URLs in the campaign and a link to your Click Map. A Click Map shows you where people click in your email campaign.
Open rate
Email open rates show the percentage of the email recipients who open an email. This KPI reveals how compelling your subject lines are.
Mailchimp loads a small, transparent image into each campaign and counts how frequently the image is loaded across all delivered campaigns to determine the open rate. The image is invisible to your subscribers.
Click rate
The click rate is a percentage that indicates how many successfully delivered campaigns had at least one click. Your click rate reveals general trends but isn’t remarkably detailed.
Unsubscribes
This KPI measures the percentage who have decided to no longer receive your campaign emails. When a subscribed contact in your audience opts out of future email marketing, it’s called an unsubscribe.
Reach
Reach refers to the total number of people who have seen your email. If 100 people have seen your email campaign, your email’s reach is 100. On the other hand, Impressions refer to the number of times your email has been displayed on a screen.
Campaign Emails Open
Open tracking lets you know if your contacts open the emails you send. Your campaign report will list the contacts who opened it and the total number of opens.
Campaign Emails Clicked
Click tracking lets you see if contacts have clicked links in your campaign.
If you enable click tracking, your campaign report will show which contacts clicked your links and how many times each link was clicked. Like open tracking, it can help measure subscriber engagement.
Bounces
Bounces happen when Mailchimp can’t deliver an email to an email address. When an email bounces, Mailchimp classifies it as either soft or hard.
A hard bounce means a permanent reason an email cannot be delivered. In contrast, Soft bounces typically mean a temporary delivery issue and are handled differently than hard bounces by Mailchimp.
List Growth Rate
The list growth rate is a metric used to track the rate at which your subscription list is growing.
You can calculate this by subtracting the number of unsubscribes from the number of new subscribers, dividing that by the total number of email addresses on your list, and multiplying it by 100.
Click-Through Rate
The email click-through rate is measured by the number of subscribers that have clicked on at least one link in your email marketing campaign.
To calculate the email click-through rate, divide the number of people that have clicked on your email campaign by the number of emails you have sent.
Conversion Rate
Conversion rate is the percentage of user actions taken after total clicks on a display ad or other digital asset.
Your marketing strategy defines your actions, which commonly include clicking on a second link, downloading an asset such as a B2B (business-to-business) white paper, or signing up to receive special retail offers.
The formula is clicks/actions * 100% = conversion rate. Thus, the higher your conversion, the more successful your online marketing campaign.
Revenue Generated
After you’ve connected your store to Mailchimp and turned on e-commerce tracking, Mailchimp will let you know how much revenue you’ve earned from email marketing.
You can use this data to track total campaign revenue and individual product sales and boost your customer satisfaction metrics.
Now that you know all the key Mailchimp KPIs to track, we’ll take you through how to create a Mailchimp report in the next section.
How to Create a Mailchimp report on Data Studio
Connecting Google Data Studio to other platforms like Facebook Ads, Facebook Insights, Instagram Insights, Linkedin, and many others requires Partner Connectors.
And you can also upload your data manually via Google Sheets, Excel, or any third-party software by downloading a .csv or .xlsm file format and uploading the same on Google data studio.
However, The easiest and fastest way to connect your Mailchimp data to Google Data Studio is via Porter Metrics.
That’s why we’ll walk you through putting together your first interactive dashboard on Google Data Studio with the MailChimp connector we created for you at Porter Metrics.
Here are the steps we’ll take you through:
- Sign up to Porter Metrics
- Set up your Google account for MailChimp Google Data Studio
- Create a new Data Studio report
- Add Porter Metrics Google Data Studio MailChimp Connector
- Authorize the Connector
- Grant MailChimp authorization to Data
- Grant MailChimp authorization via Porter Metrics
- Connect your MailChimp data to your Google Data Studio report
After signing in to Data Studio with your Google account, the next step is to connect your Mailchimp account to Google Data Studio. This setup allows you to get data from Mailchimp’s built-in analytics.
On the left-hand menu on your data studio dashboard, click Create. On the drop-down menu, click Report.

Clicking Report takes you to the Google data studio connectors library. The library has a range of connectors and is divided into two categories:
1. Google connectors

2. Partner connectors

The difference between these categories is that the Google data studio team builds and maintains the Google connectors. In contrast, third-party data analytics companies like Porter metrics create and maintain partner connectors.
Sign up to Porter Metrics
Signing up on Porter Metrics is the first step to creating a Mailchimp report on Data Studio. Here’s how:
Step 1: Go to the Porter Metrics Homepage, then click Sign in in the homepage’s top left corner.

Step2: Sign in with your Gmail or Gsuite account

Now, you’ll be redirected to your Porter Metrics dashboard.

Set up your Google account for MailChimp Google Data Studio
To access your Google data studio account, simply visit datastudio.google.com.

If you haven’t signed into data studio with your Google account, you will be required to do so before using the tool.
If you click Blank Report or Create, as shown in the image above, you will be presented with this pop-up.

Enter your basic information and click Continue at the bottom left corner of the pop-up form. Doing so leads to setting up your Google account’s next step- setting your email preferences.

Google gives you options on the types of emails you would like to receive from them.
You can accept all their recommendations by clicking Yes to all their preferences, or you can decide not to accept a particular email by clicking No.
Click Continue on the bottom right corner after setting your email preferences. Doing this links your Google account to the data studio.
Create a new Data Studio report
The next step on how to create a Mailchimp report is creating a new Data Studio report.

Add Porter Metrics Google Data Studio MailChimp Connector
To access the Mailchimp connector, you need to link your Google account to our connector. Search for Porter on the search bar.
The result brings a list of connectors designed by our fantastic team. Click Mailchimp as shown below:

Authorize the Connector
You will be required to authorize the data studio to use Porter’s MailChimp connector for your account. Simply click AUTHORIZE.

Choose a Google account to continue with Data Studio.

Grant MailChimp authorization to Data
After authorizing Google data studio to continue with your Google account, the next step is to authorize Google data studio to use Porter to report data for you, as shown below:

Click AUTHORIZE. Doing so would bring the pop-up as shown below:

Choose an account to continue with Porter metrics. Immediately after you do so, you will be notified that Porter Metrics requires access to your Google account.
This action allows Porter metrics to connect to an external data source- in this case, your MailChimp data.
Next, click Allow.

If you’re concerned about your privacy, we only retrieve your email, so you don’t have to fill in a form, and we can assign your new account to your email address.
Grant MailChimp authorization via Porter Metrics
The next step is to connect your Mailchimp account to Data Studio.
After allowing Porter Metrics to access your Google account, you must log in to Mailchimp to connect to your Mailchimp data, as shown below.

Enter your Mailchimp login details and click Log in.
The previous step leads you to an authorization page that requires you to allow our connector – Porter metrics, to connect to your account on Google data studio. All you need to do is to click Allow.

Clicking Allow directs you to Porter’s Hub, where you can set up the (MailChimp connector).

Connect your MailChimp data to your Google Data Studio report
The final step on how to create a Mailchimp report is connecting your MailChimp data to your Google Data Studio report.
Click Choose your Mailchimp account. This step starts setting up the correct parameters for the connector.

In this case, you would have to select the Mailchimp account you want to use as a data source for your reports.
After selecting your Mailchimp account, click Add. Check the box that says Allow “Select your Mailchimp account ” to be modified in reports.

After clicking Add, you get a pop-up to confirm that you want Porter metrics to create reports from your Mailchimp account. Click Add to report.

Clicking Add to report lets you see Mailchimp metrics on our connector.
Great. Now, you know how to create a Mailchimp report. Next, let’s check out some of the top Mailchimp reporting tools.
Mailchimp Reporting Tools
The default reports Mailchimp offers on its platform might not provide the insight you need on your data. This section will highlight some of the top Mailchimp reporting tools.
Porter Metrics

Porter is built for marketers who don’t code, want to do things by themselves, appreciate personalized email and chat support, and hate bureaucracy.
You can use Porter to get your reports in the tools you’re already familiar with and where your data is already.
Are you tired of typos and data entry mistakes, not knowing what to improve on time, not having time to focus on what matters, and other reporting tools that make you slower?
You should use Porter Metrics to avoid the stress of manual reporting and other not-so-effective reporting tools.
Supermetrics

Supermetrics offers one of the easiest ways to move Mailchimp data to your reporting, analytics, and storage platform of choice.
With supermetrics, you can access all your marketing data, see all metrics & dimensions, get granular email reporting, and create multi-campaign reports.
The platform can send your Mailchimp data to Data Studio, Excel, and Google Sheets.
Power My Analytics

Power My Analytics can integrate MailChimp metrics where you need them. The platform lets you automate data collection and delivery to your marketing report, dashboards, & spreadsheets.
Power My Analytics offers Mailchimp reporting templates for their Data Studio, Google Sheets, Microsoft Excel, and BigQuery connectors.
Kissmetrics

If you have been using Mailchimp for your email campaigns, you can import event data about the people who saw, opened, and clicked through your emails with Kissmetrics.
You should know that the Kissmetrics Mailchimp integration works best if you’re already using visitors’ email addresses to identify them.
Also, Kissmetrics will import data from your existing campaigns from the last 100 campaigns, starting with the most recent ones.
Cyfe

Cyfe is a comprehensive business dashboard app that makes it simple to monitor all of your company’s data (such as social media, marketing, analytics, sales, support, and infrastructure) in one location.
Get 15 Days Porter Metrics Free Trial (worth $15)

Creating a Mailchimp Report with Porter Metrics Template
Porter lets you create new reports and pages within the templates.
To create your first Mailchimp report, connect your Mailchimp account to Google Data Studio as described and link it to our connectors.
Doing so will lead you to a reporting dashboard where you can start creating your reports.

Click on the drop-down in the top-left corner of the report where it says Page, and then click on Create a new page.

After creating a new page for your report, on the right-hand menu, drag and drop the metrics that you need in your report.

Free Data Studio templates for Mailchimp

We offer you a free data studio template to ease your reporting tasks. This template includes various metrics and KPIs to track the performance of your email marketing campaigns.
The template has five pages to offer you the best insights on your campaign and help you get started:
- Set up page
- Campaign Overview and Performance Page
- Campaign Information Page
- List member information page
- A/B Testing Data
Conclusion
There you have it, a comprehensive guide on how to create a Mailchimp report.
With this article, you should have a deeper understanding of Mailchimp reports and the various types, key Mailchimp KPIs to track, how to create a Mailchimp report and the top Mailchimp reporting tools.
One of the top Mailchimp reporting tools is Porter Metrics, built for marketers who don’t code but need to analyze marketing data and create reports.
With Porter Metrics, you can spend time doing more productive tasks. We offer free template galleries, premium technical support, and familiar marketing tools.
The reports Mailchimp offers will not always provide the insight you need to advance your email marketing campaigns.
You should try Porter and create a free report with the Mailchimp template. Also, if you’re new to Data Studio, you can schedule a call to book a free report setup.
Frequently Asked Questions
How do I create a report in Mailchimp?
To create a report in Mailchimp, follow these steps:
Step 1: Sign up on Porter Metrics.
Step 2: Set up your Google account for MailChimp Google Data Studio.
Step 3: Create a new Data Studio report.
Step 4: Add Porter Metrics Google Data Studio MailChimp Connector.
Step 5: Authorize the Connector.
Step 6: Grant MailChimp authorization to Data.
Step 7: Grant MailChimp authorization via Porter Metrics.
Step 8: Connect your MailChimp data to your Google Data Studio report.
For more details, navigate to the section on How to Create a Mailchimp report on Data Studio.
Can you export Mailchimp Reports?
Follow these steps to download a Regular, Plain-Text, A/B, Multivariate, or RSS report:
- First, click Campaigns.
- Then, click Reports.
- Next, click the View Report drop-down menu next to the report you want to work with and choose Download.
Follow these steps to download an automation report:
- First, click Campaigns.
- Next, click Reports.
- Then, click Automations.
- After that, find the automation you want to work with and click View Report.
- Then, click Download.
To download a report for a specific email in an automation, follow steps 1-3 above, then click View Report for the automation email you’re interested in. On the report page, click Download.
Mailchimp will send a notification email to the primary account contact when your export is ready.
How do I run a report in Mailchimp?
There are various reports you can run in Mailchimp. To access your email campaign report, follow these steps:
- Click Campaigns.
- Then, click Reports.
- If you have multiple audiences, click the Current audience drop-down and select the one you want to work with.
- On the Campaigns tab, find the email you’re interested in and click View Report.