In this tutorial you’ll learn six different alternatives on how to share a Looker Studio report:
- Schedule report delivery via email to specific users or teams
- Generating shareable links to your reports
- Downloading reports as PDFs
- Embedding reports on your website or application
- Provide access to certain users
- Make your dashboards public
Understanding the differences between these sharing options and what they mean for the people who will access your report is essential.
I’ll take you through each sharing option in detail, including how to use them, different scenarios in which you could use them, and other relevant information.
We also made a step-by-step tutorial on how to do it:
The easiest way to share a Looker Studio report
To share looker studio reports, follow these steps:
- Open the Looker Studio report you want to share
- In the right corner of your report click ‘Share’
- You’ll see that an emerging screen will open where you can add specific users and groups by just typing their emails.
- Now select if you want to give them viewer or editor permissions.
Inviting people to view or edit a report on Google Data Studio
You most likely want your dashboard to be private, accessible only to the clients you specifically invite to view or change it. You can add the clients’ email addresses to the list of all the users.
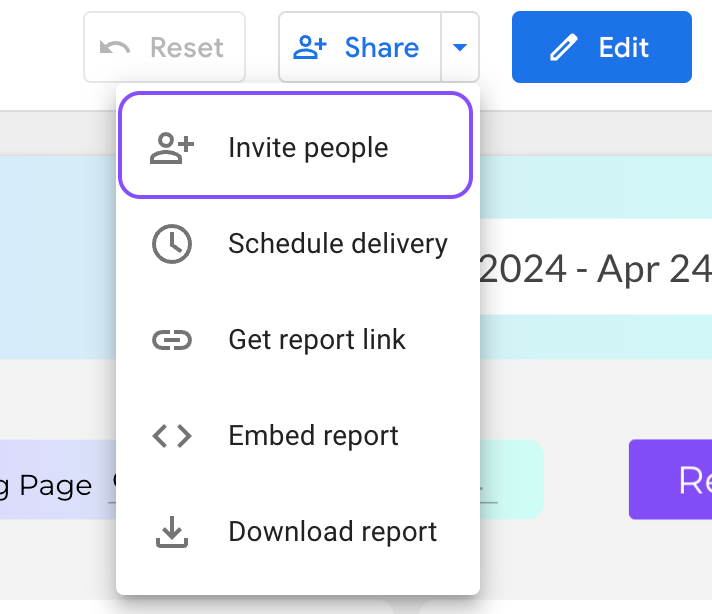
You can invite customers by email to view, analyze, edit, or contribute to a report by following these steps:
- First, click Invite People from the Share drop-down menu in the report’s top-right corner.
You can also click the share button directly.
- Here, you can configure access rights with two primary options: View Only and Edit Permissions.
These have varying degrees of accessibility, but they are relatively easy to understand on their own.
If you’re the owner, you can also restrict editors from altering access levels and adding people on their own, as well as viewers from downloading or duplicating your dashboard.
Let’s check out the two sharing options:
View Only
Sharing reports with clients in View Only mode prevents them from editing the report’s format or contents.
Here’s how to share your reports with clients in “view-only” mode:
- Click share in the top right corner of your report
- In the Add People section, enter the email address of the client you want to invite.
- Assign ‘Can View’ as the user’s permission type.
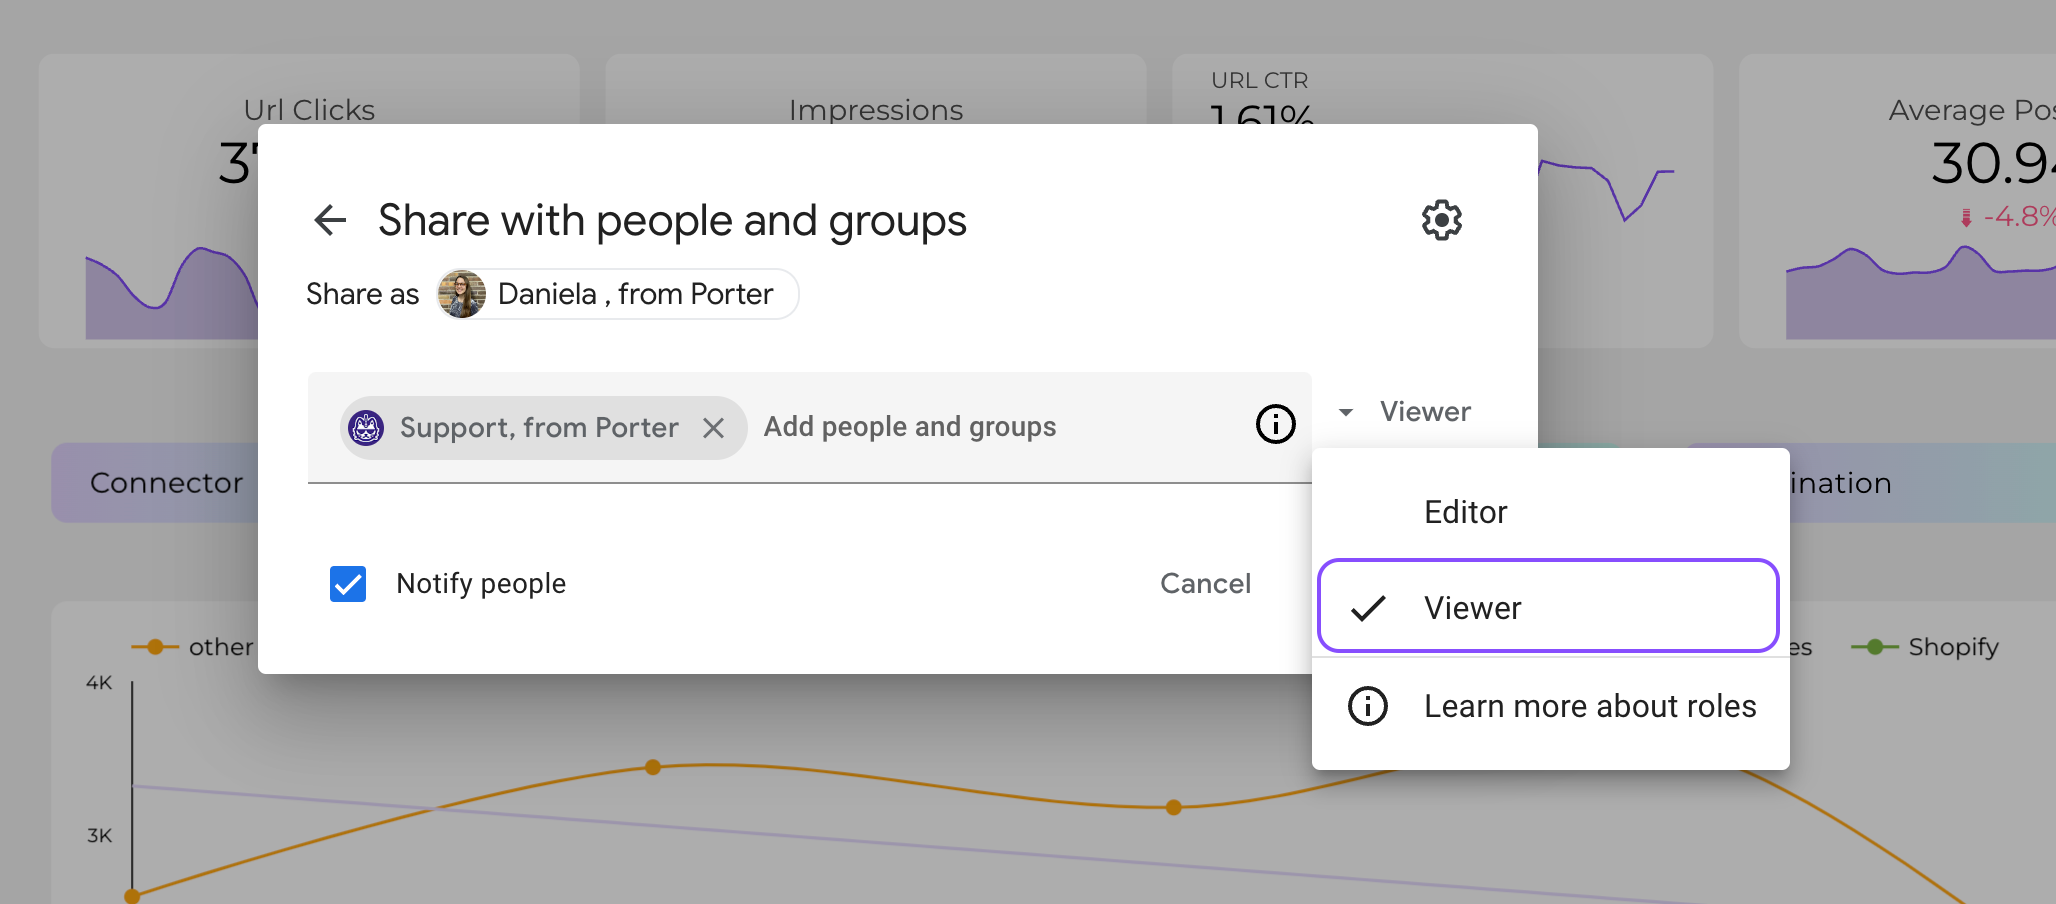
- You can decide to notify the person(s) you’re sharing access with by email by checking the box in front of ‘Notify People’
- Then, click ‘Send’
Editor permissions
If you’re okay with it, you can allow your clients to make changes to your Google Data Studio reports.
- Click share in the top right corner of your report
- In the Add People section, enter the email address of the person you want to invite.
- Assign Can Edit as the user’s permission type.
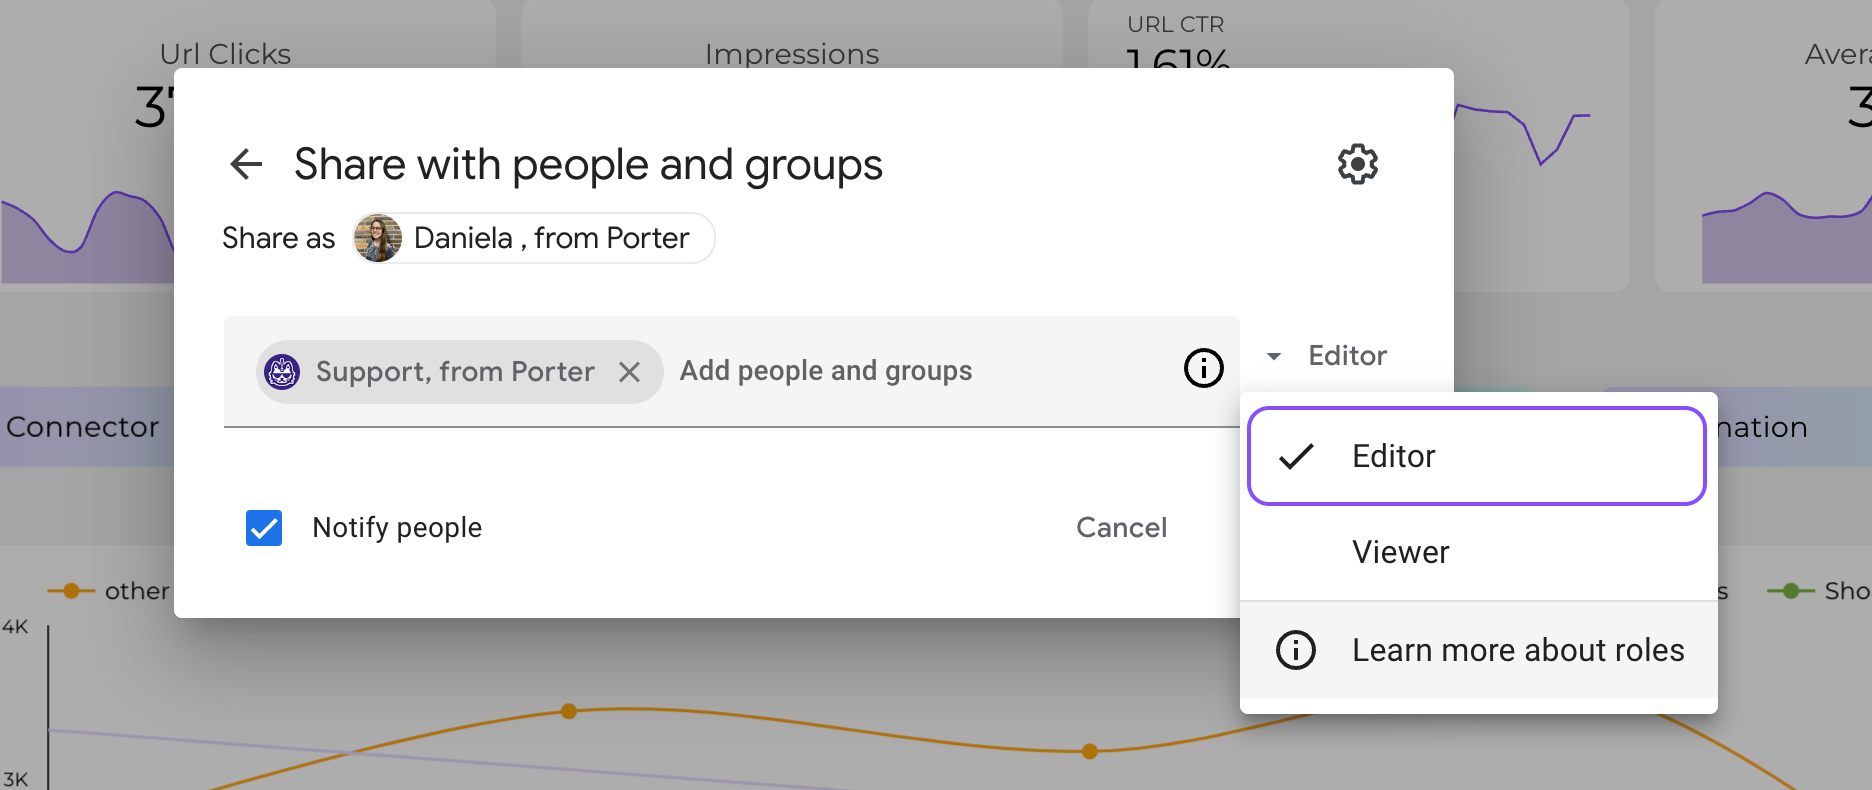
- Remember to click Notify People to email the user receiving the invitation.
- Then, click Send.
Sharing the report link on Google Looker Studio
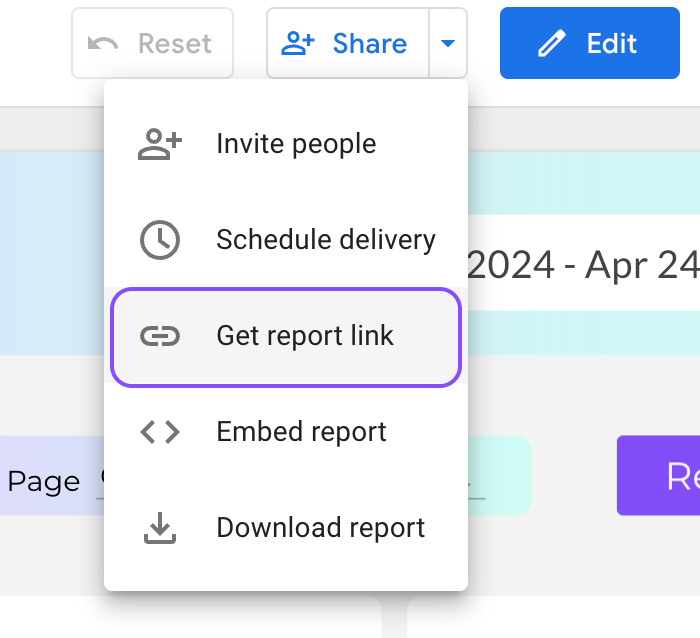
Sharing the report link is the simplest method of sharing Google Looker Studio reports with clients. It will provide you with an automatically generated link that you can use to share your reports.
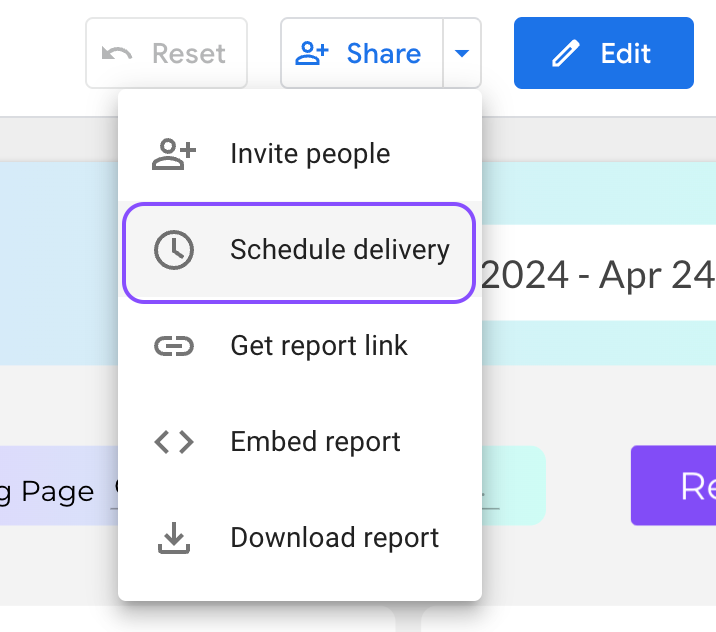
You can easily share the report with others by clicking the right arrow next to ‘Share’ and selecting ‘Get Report Link.’
You’ll need to configure your link-sharing permissions, you’ll find four different alternatives in the Link Settings section:
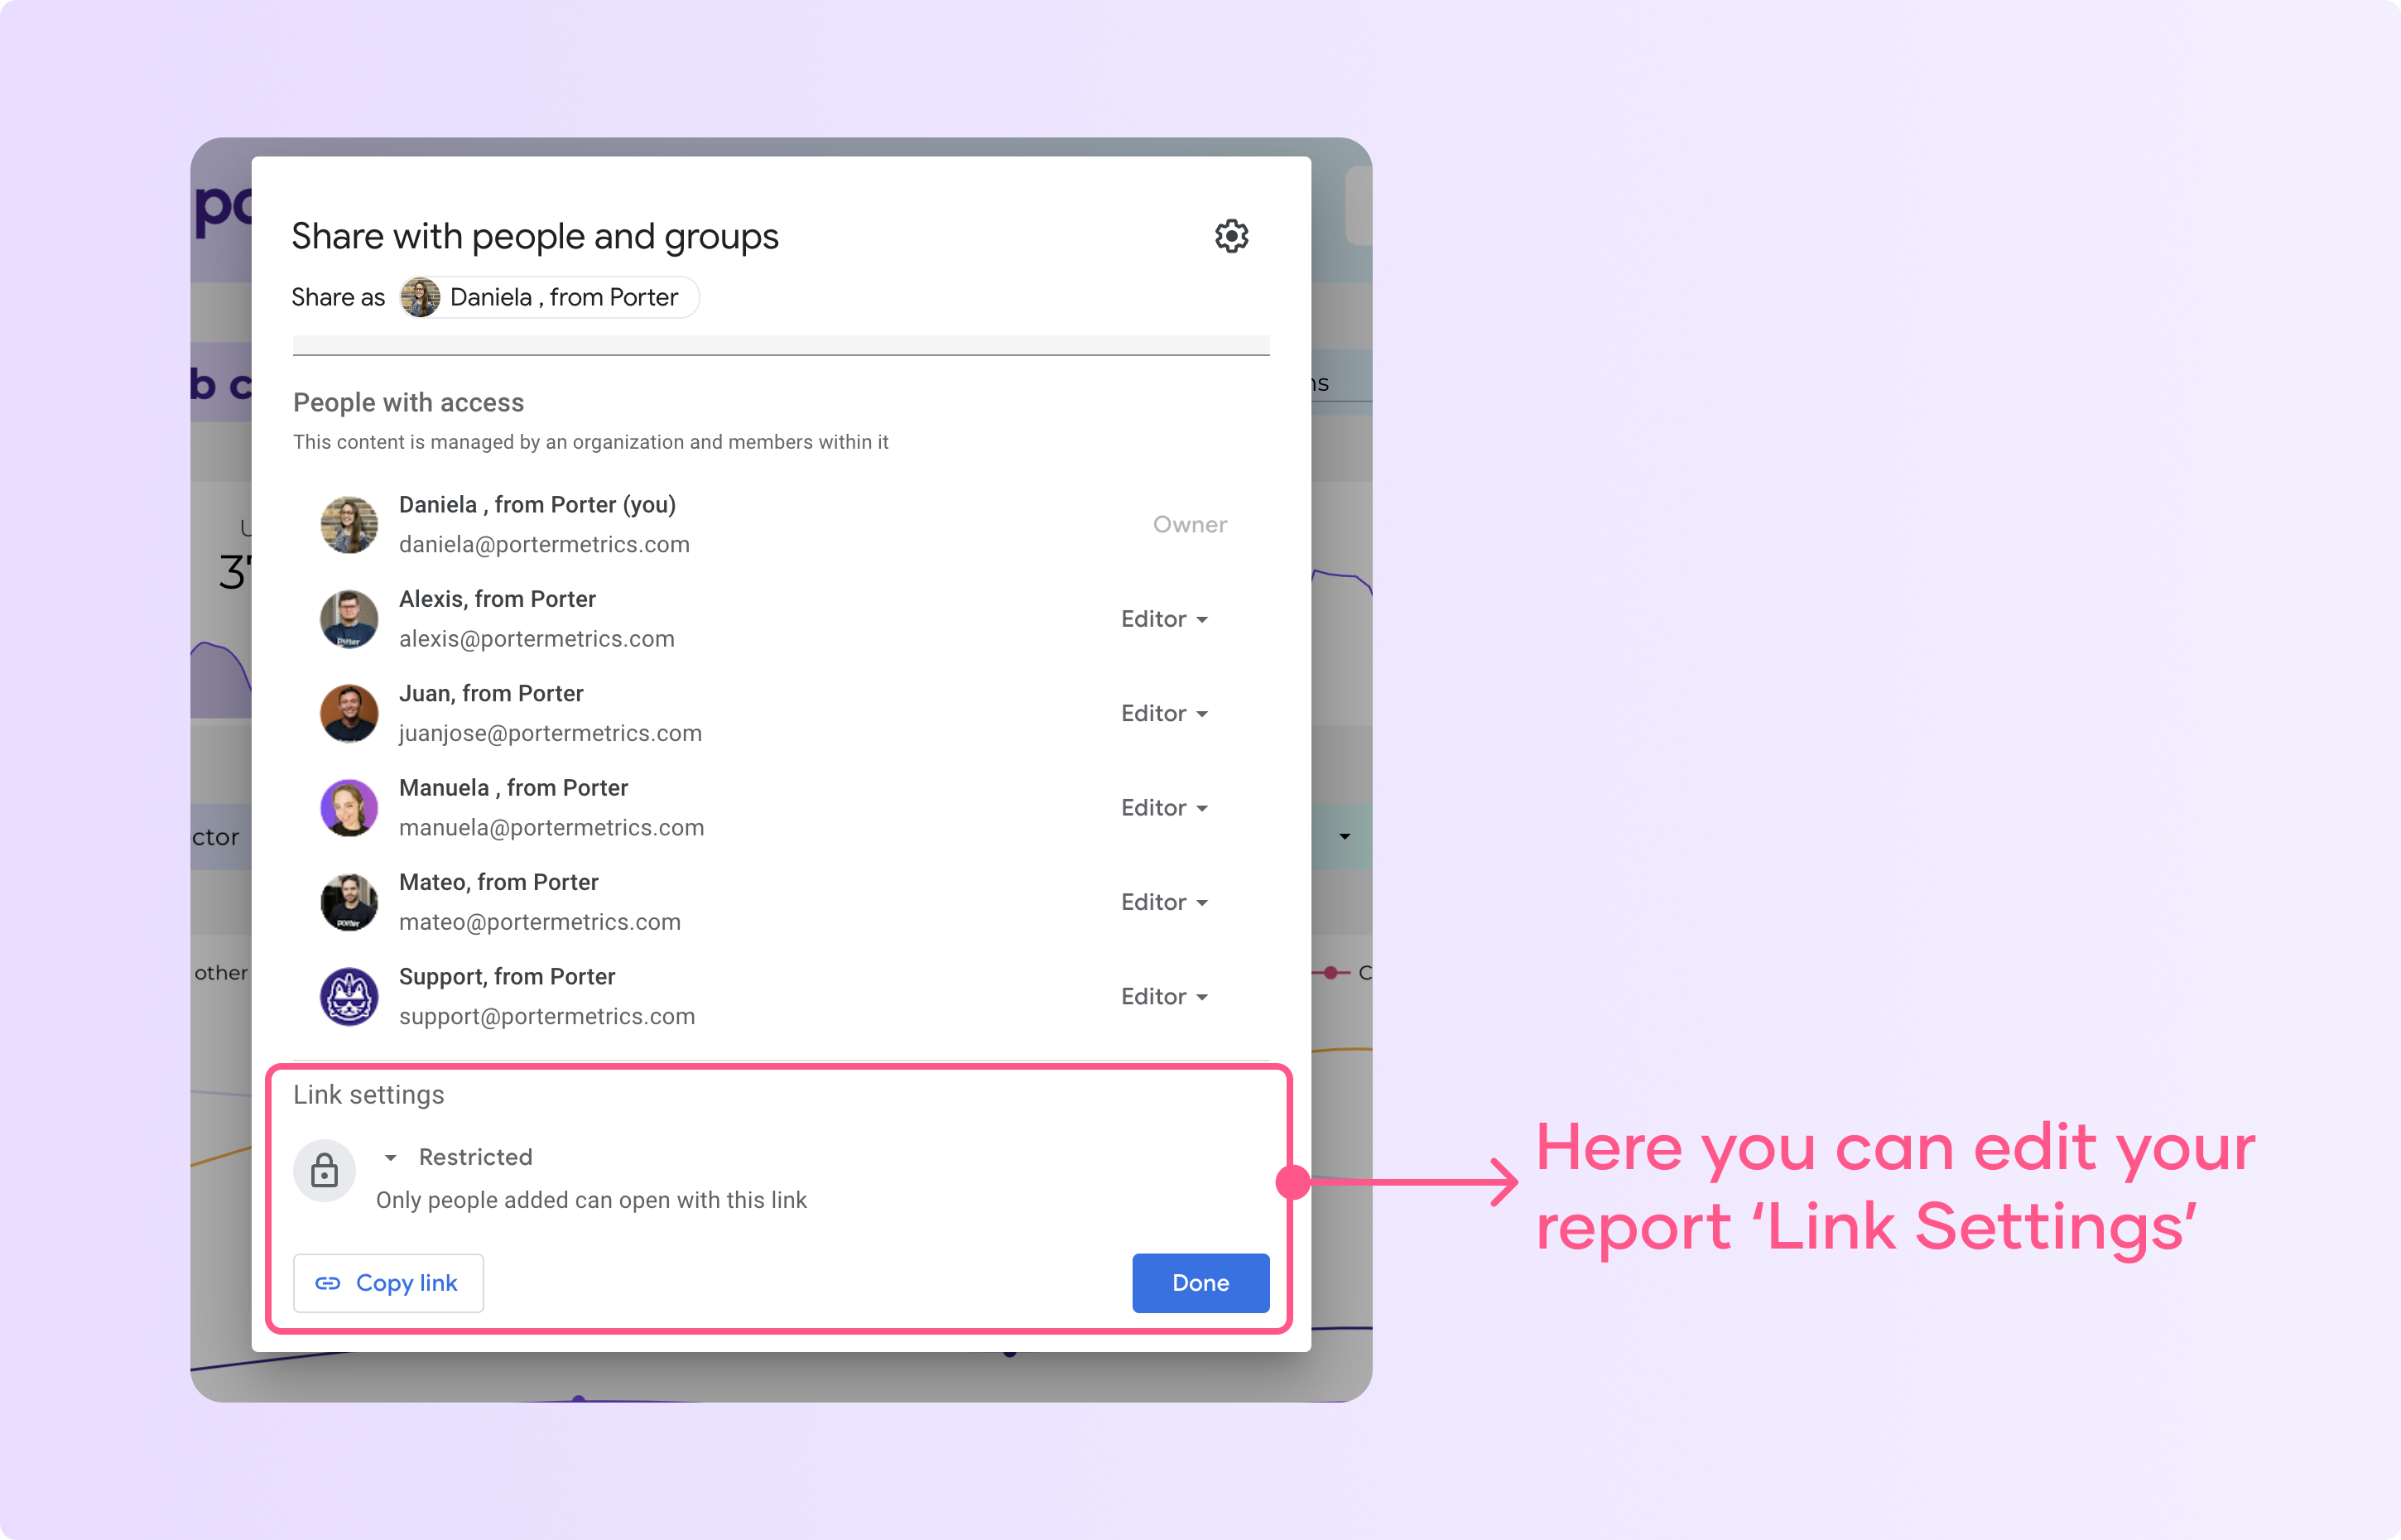
- Restricted: Only people added can open with this link can view or edit
- Company domain: Anyone in the domain with the link can view or edit
- Unlisted: Anyone on the internet with the link can view or edit
- Public: Anyone on the internet with the link can find and view or edit
The following are the access options Google Data Studio offers:
Public: anyone on the internet can find and view or edit
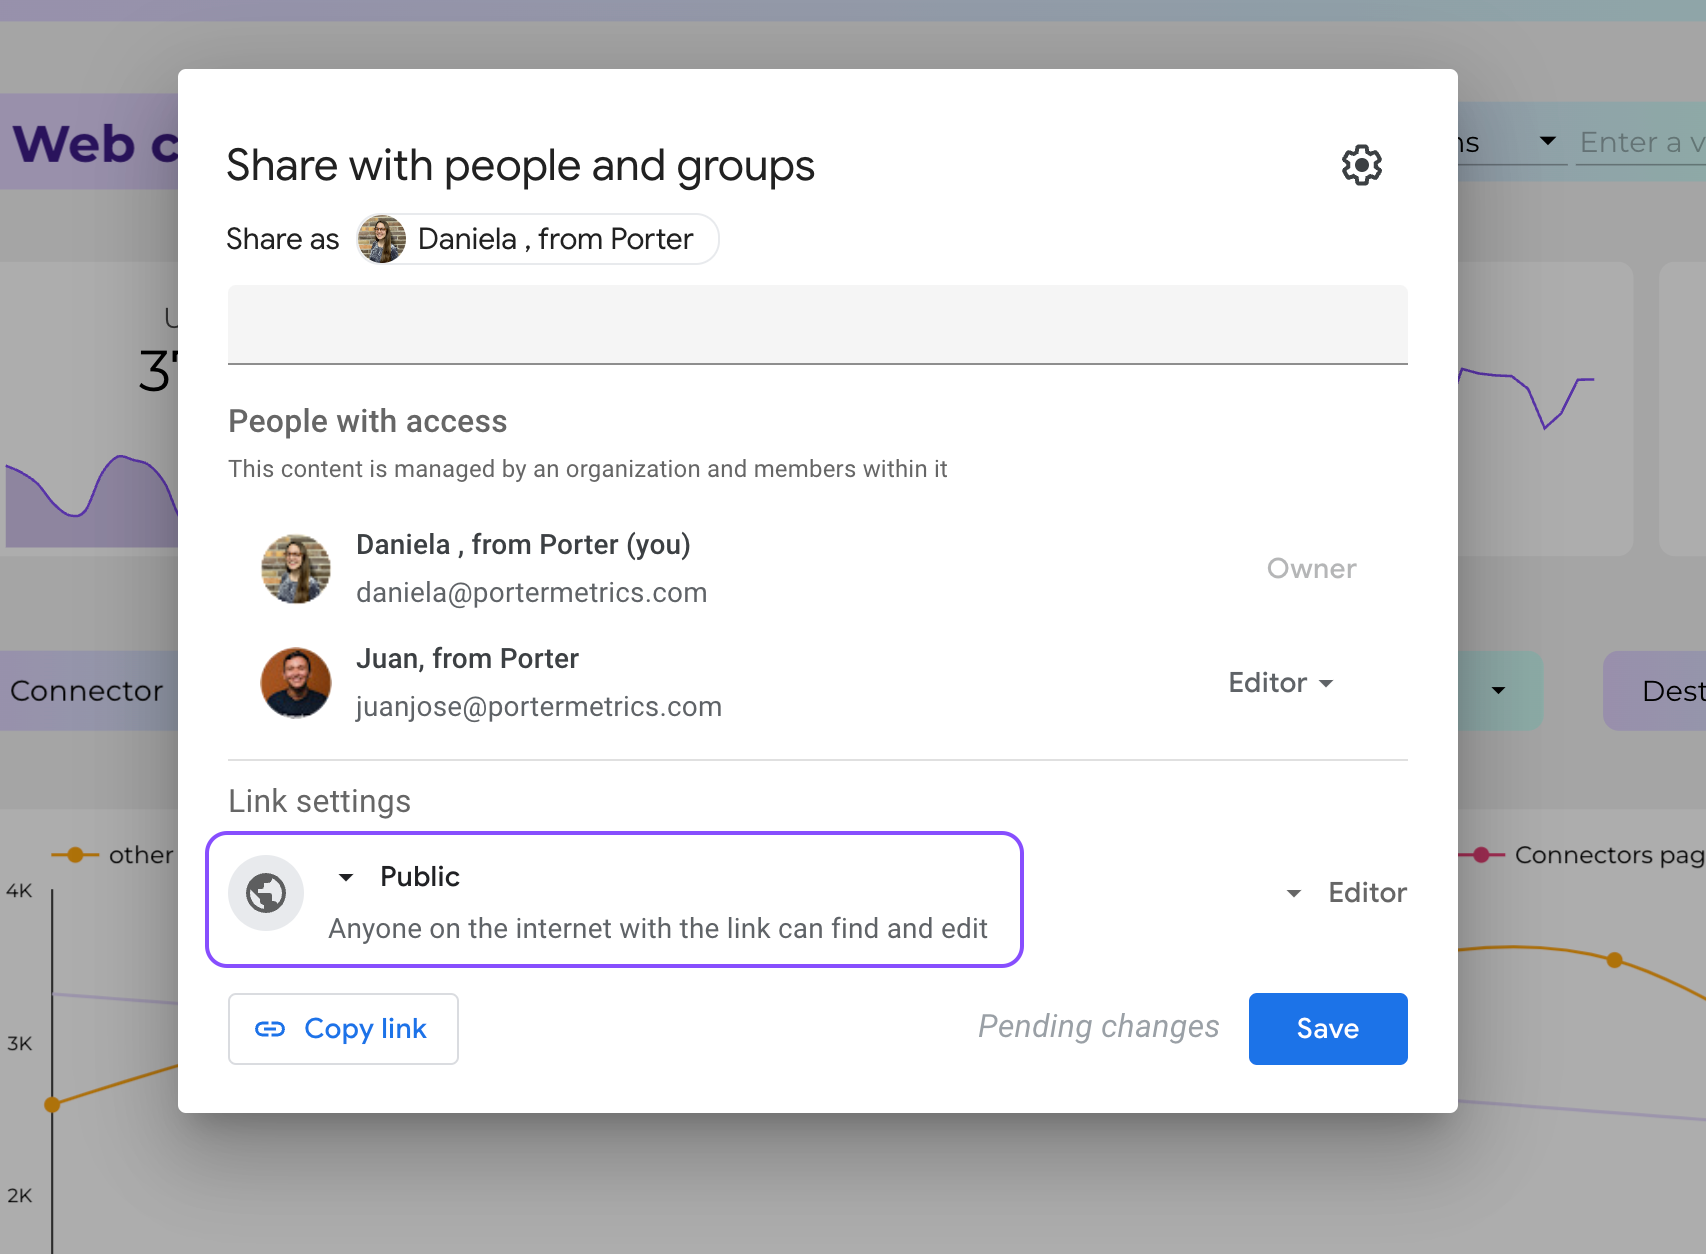
With this option, your report will be viewable and shareable by everyone on the internet. You can use it to create stunning, publicly available Google Looker Studio dashboards and templates.
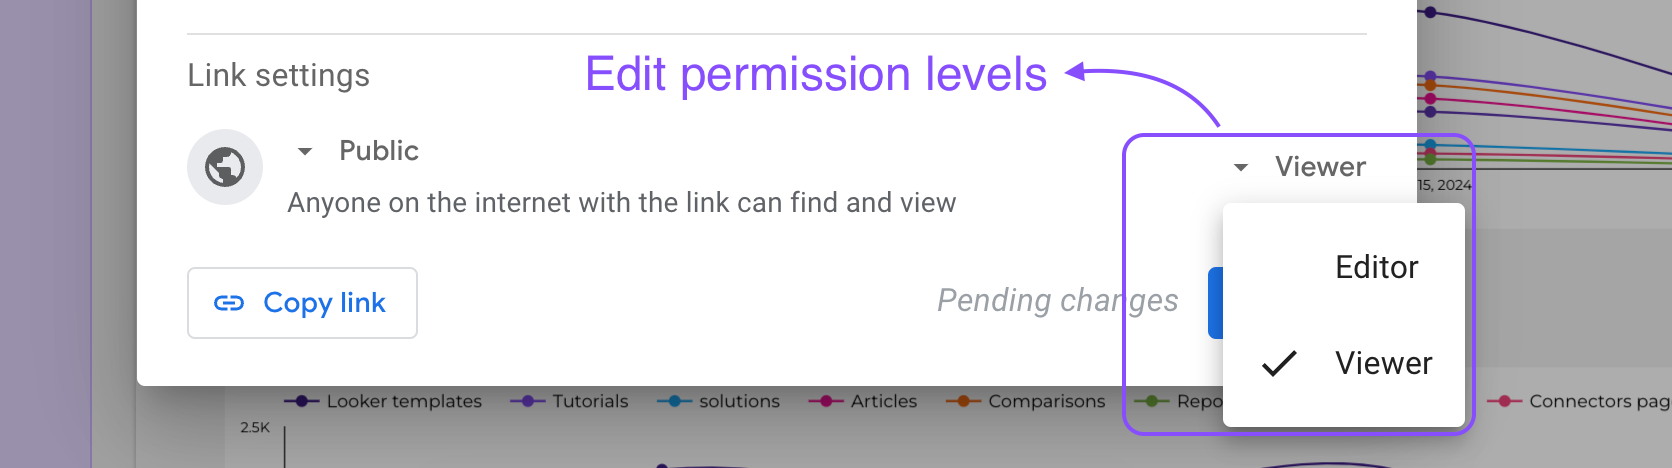
Remember you can decide if you want users to only ‘view’ or ‘edit’
If you select a Public link settings with editor permissions you give anybody the ability to view, share, and even edit your report, making it searchable on search engines like Google.
For the sake of your dashboard’s security, I strongly advise against this.
Unlisted: Anyone on the internet with the link can view or edit
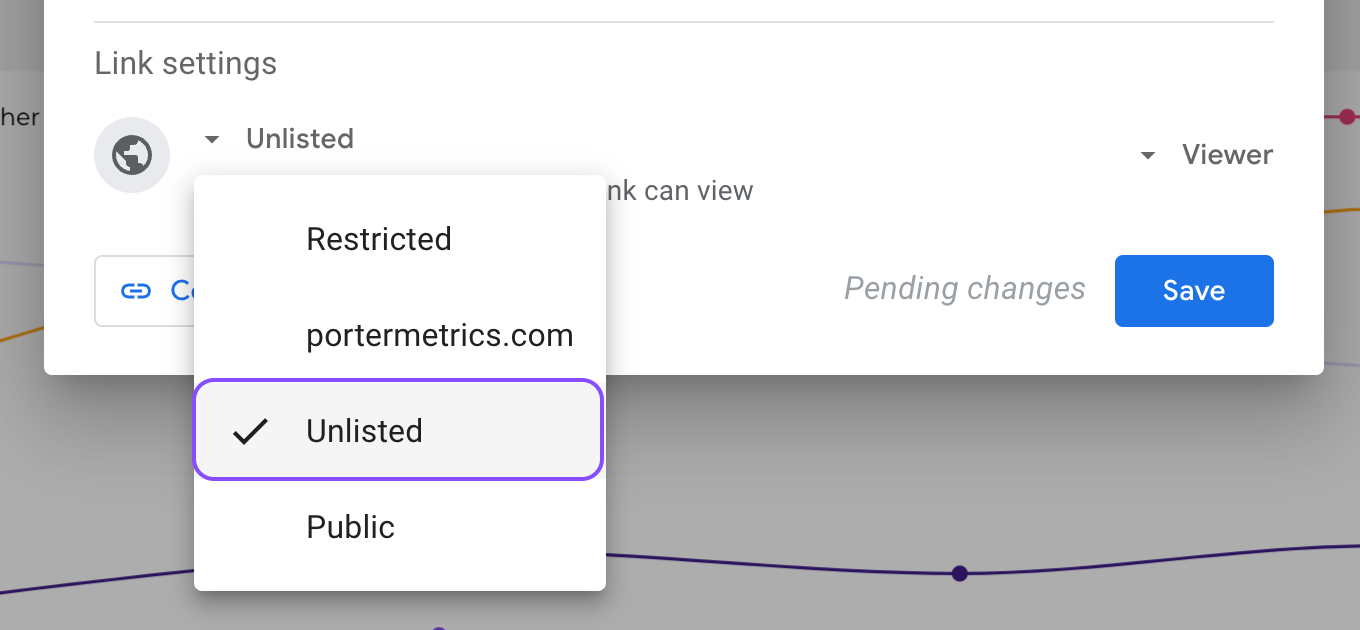
Anyone with the link can view
Choose this option if you want everyone with the report’s URL to be able to view the report. If you wish to post your report on social media, use this option to do so.
It’s both efficient and secure, making this option fantastic for dashboards with a significant number of users.
Anyone with the link can edit
Select this option if you want anyone with the report’s URL to be able to view and edit it.
Again, due to your dashboard’s security, I wouldn’t recommend this, but it is a simple approach to provide edit access.
Don’t forget to utilize the Version History to restore your dashboard if someone makes a mistake.
Anyone in your organization with the link can view or edit
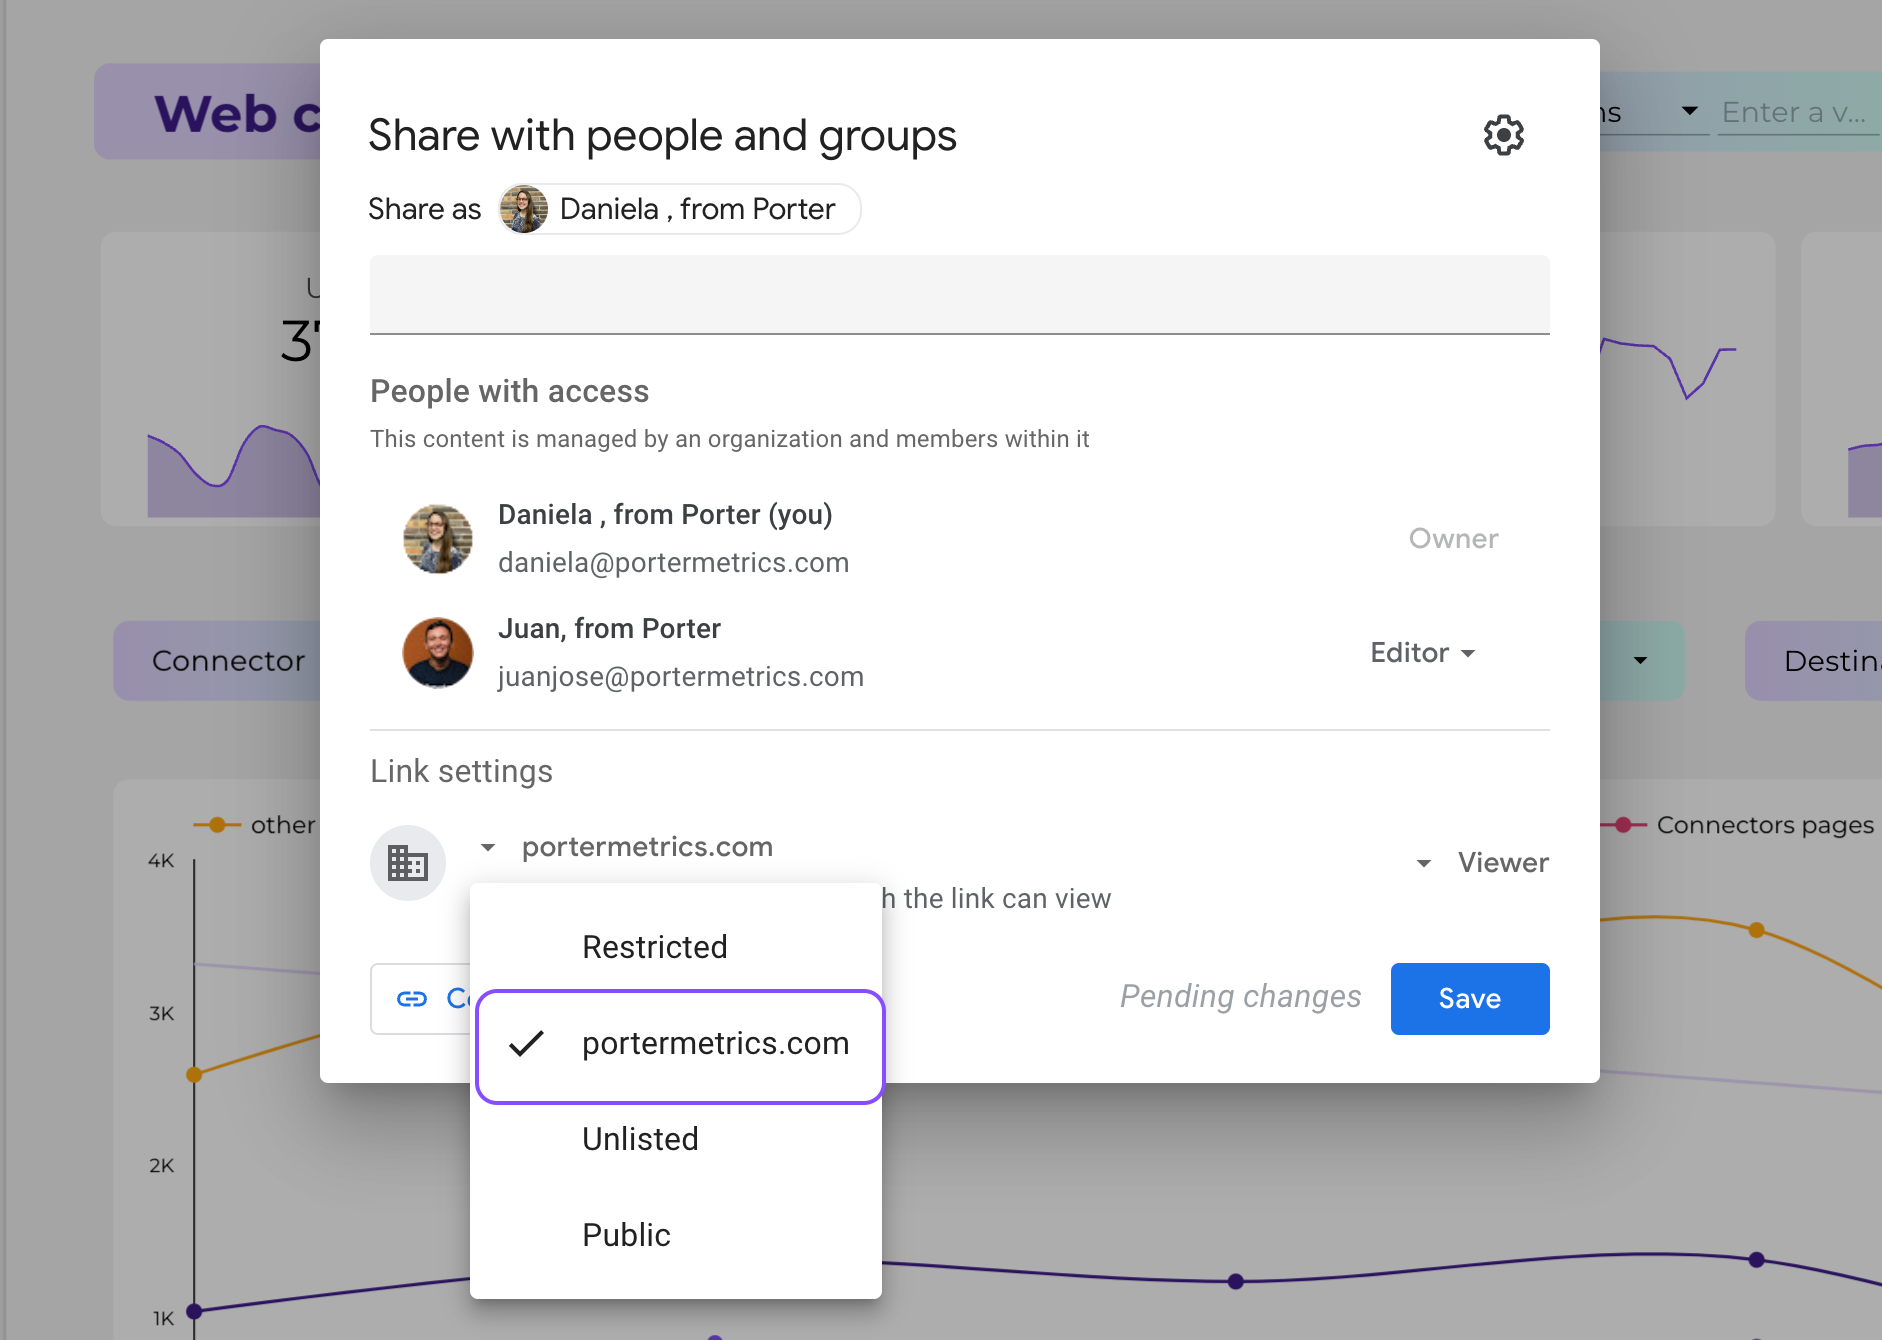
Anyone in your organization with the link can view
With this option, you can share the generated link for clients to view, but only when the user is signed in to an account belonging to an organization.
As a result, you can time by not having to create and maintain additional user accounts manually.
Anyone in your organization with the link can edit
This sharing option is the same as the previous option, but now, all of these users can make changes to the dashboard.
Your firm or group will benefit greatly from using these dashboards and reports as a collaborative tool.
Restricted: Only people added can open with this link can view or edit
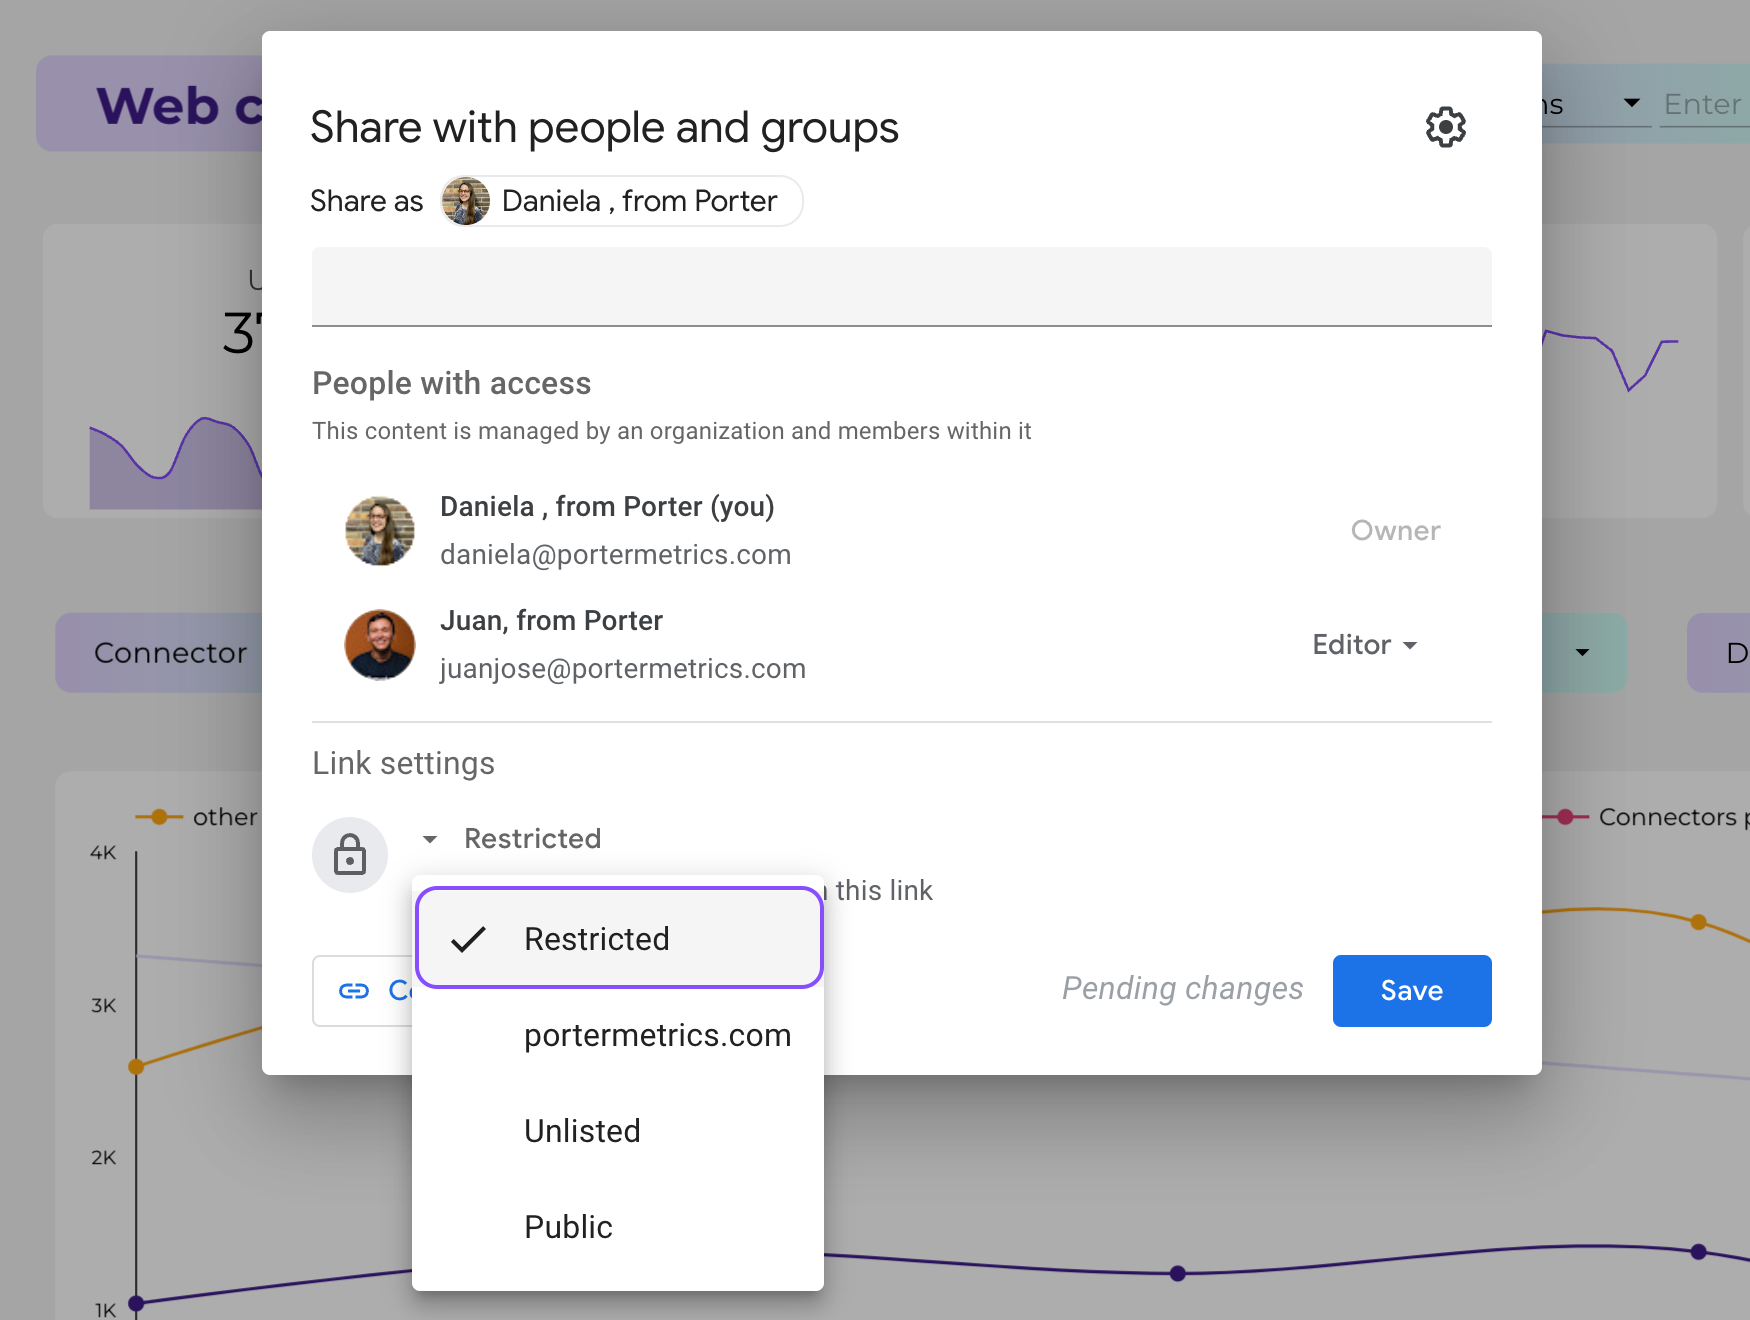
If you want your report to be accessible to just a select group of individuals, you should choose this option.
As we previously discussed, this is the configuration you should use if you want to limit access based on invitation alone.
If you are looking for ways to share Google Looker Studio reports with clients, you will see that there are many sharing options, each with specific attributes.
Sharing reports may seem like a lot, but keep in mind that each option is unique, and each use case is also different.
Schedule email delivery of a report on Google Looker Studio
Scheduling an email delivery enables you to automate the sharing of report links through email. You can set up an email distribution schedule for your dashboard and send it to a particular group of people.
You have complete control over which pages of your report are shared, and you can do so on a regular schedule.
Here’s how to schedule delivery on your report:
- In the drop-down menu under the Share button, Click on Schedule email delivery,
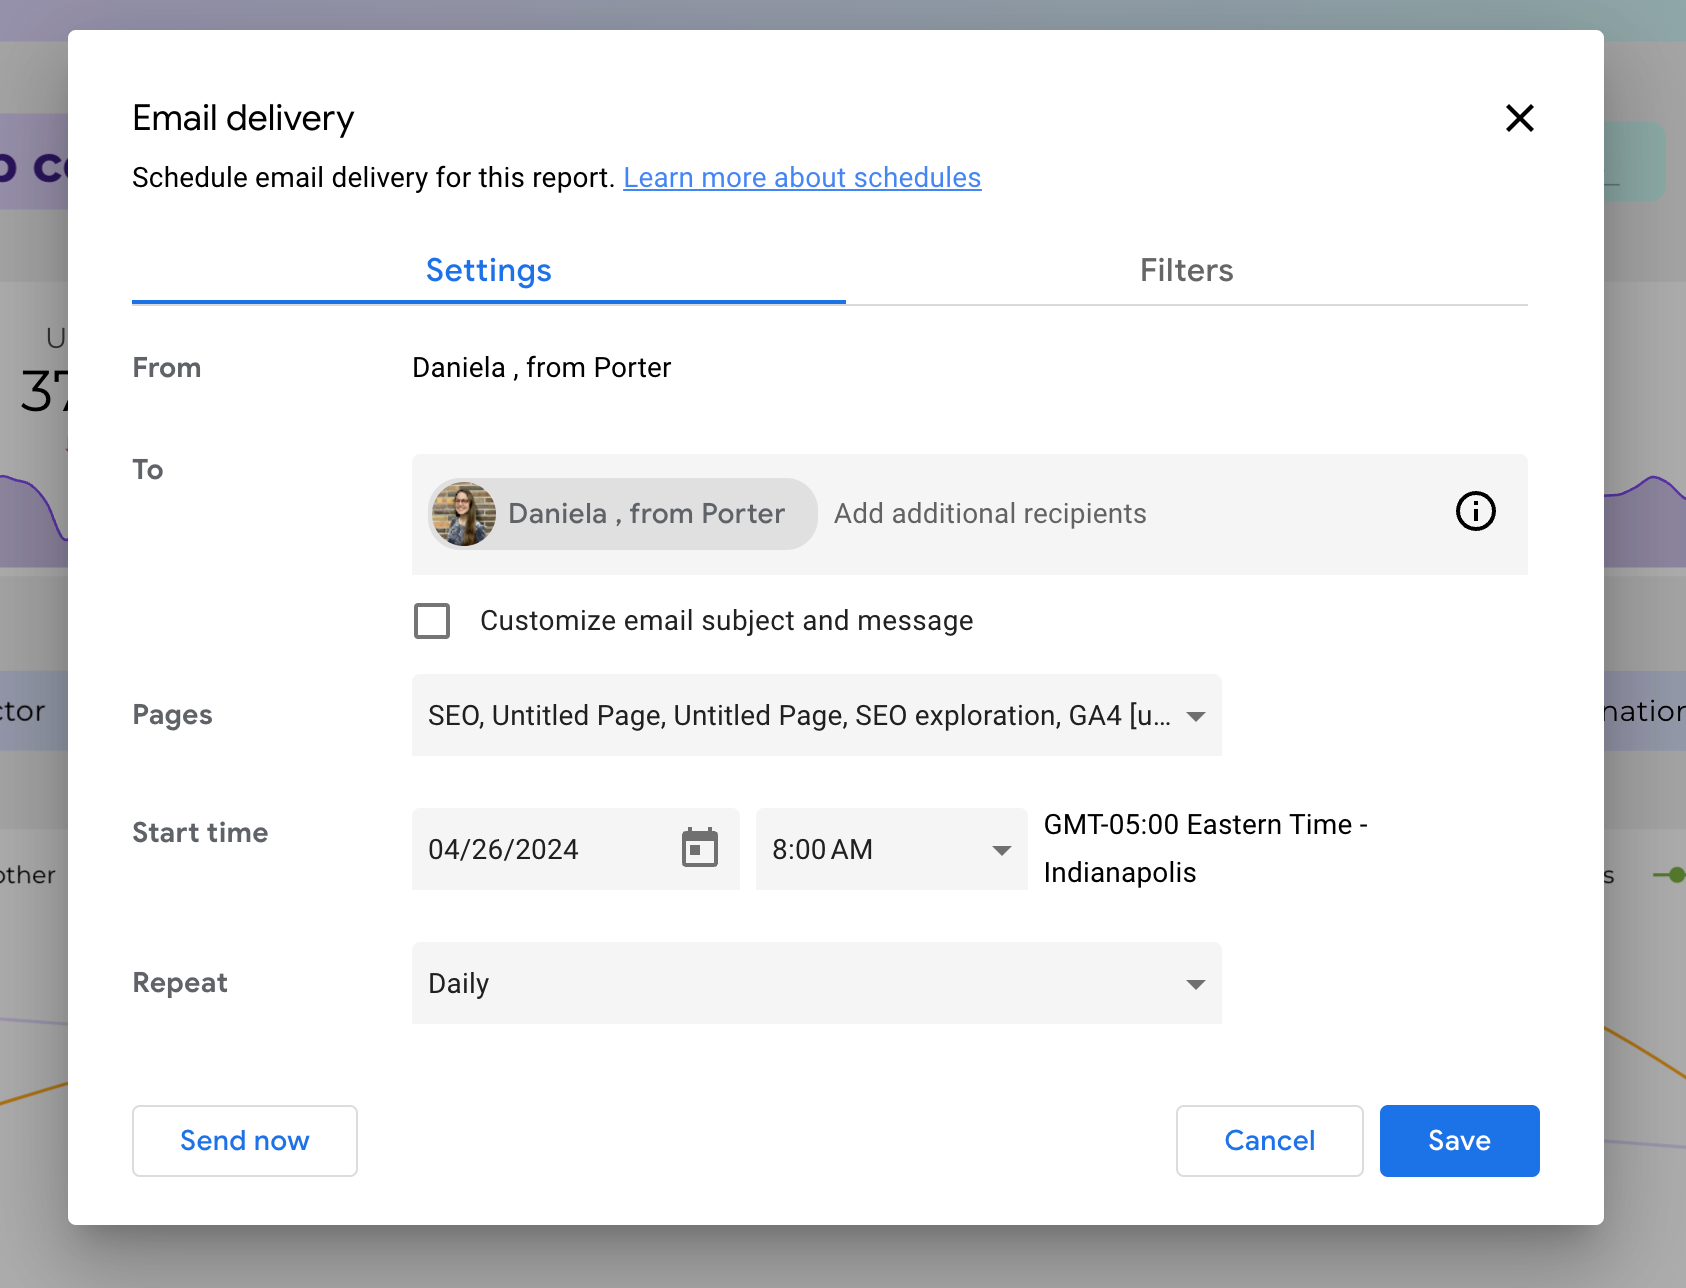
- Then, enter the email addresses of the recipients.
- (Optional) You can also customize the email subject and message.
- Next, select the pages of your report you would like to schedule email delivery for.
- After that, specify the Start Time.
- Then, select the repeat rate (Daily, Weekly, Monthly, Weekdays, or Custom).
- Last, click Schedule to finalize the automation.
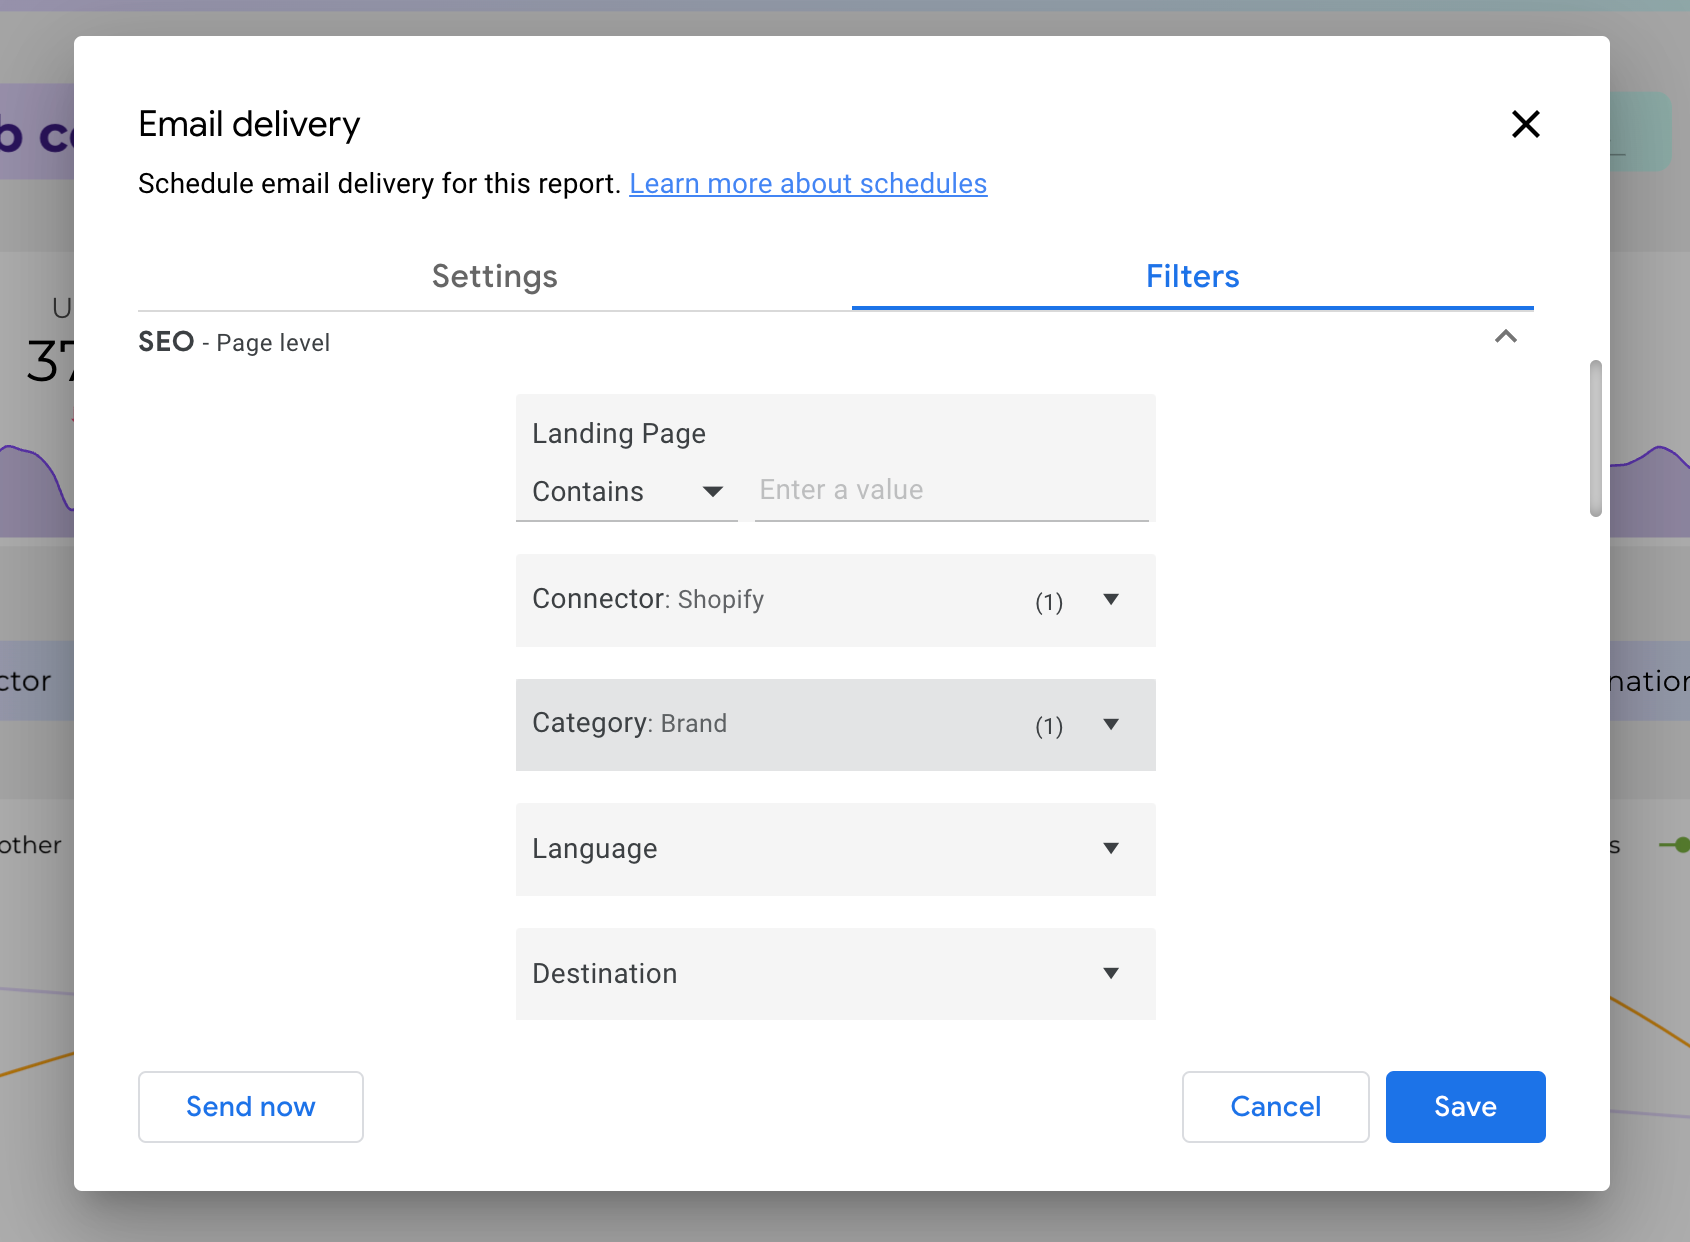
Now, you can also add filters to each page of your report so that the recipients receive the dashboards only with the relevant information.
Download Dashboard as a PDF
Another option to share Google Data Studio reports with clients is downloading a dashboard as a PDF.
Whether you wish to have your report printed to discuss with your team or if you have been requested to send it as an attachment, you can download your Data Studio dashboard as a PDF.
Here’s how to download a dashboard as a PDF:
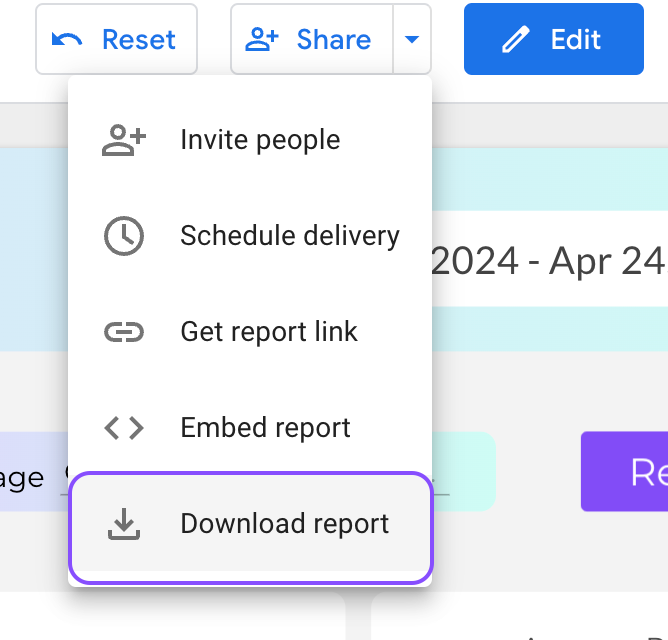
- First, click the drop-down menu beside the Share button.
- Then, select Download Report.
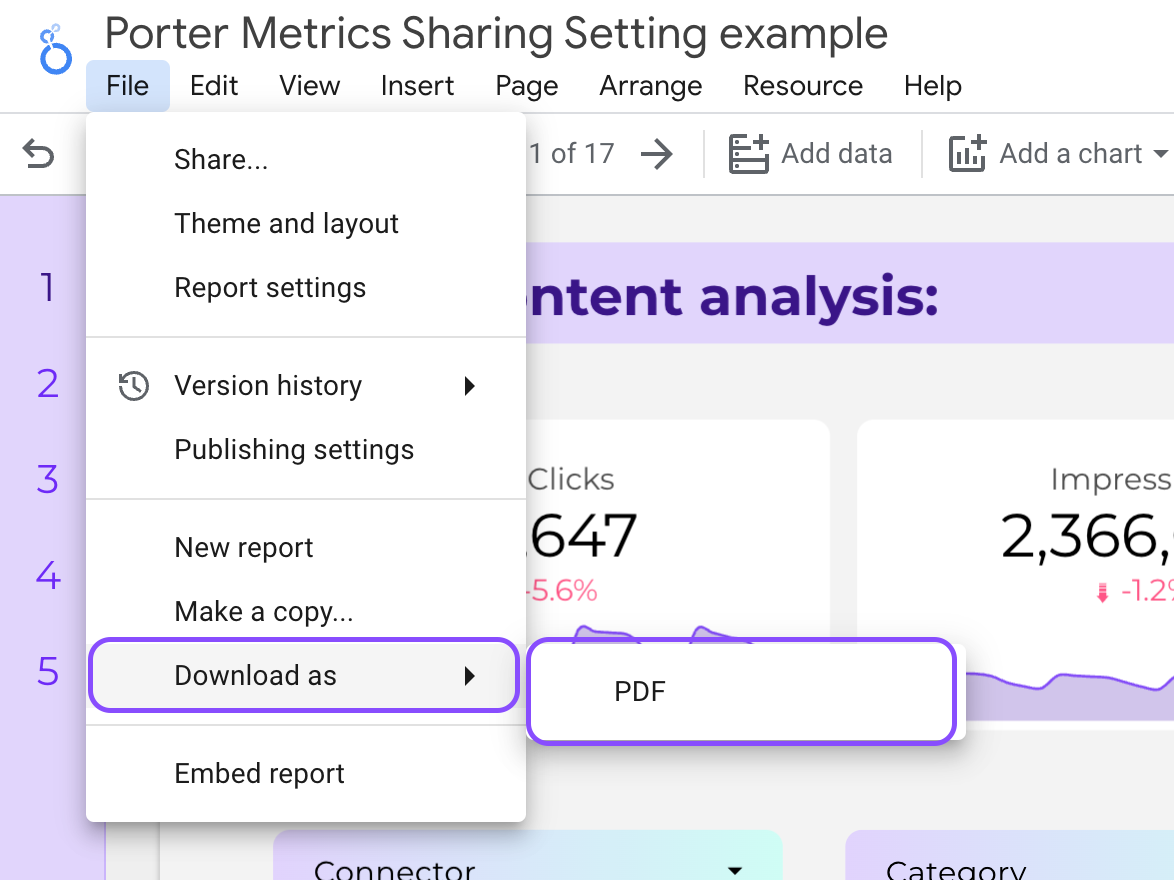
NOTE: You can also access the Download Report button from the File tab.
- Now, you’ll need to select the dashboard(s) you want to download as PDF under the Select Page radio button.
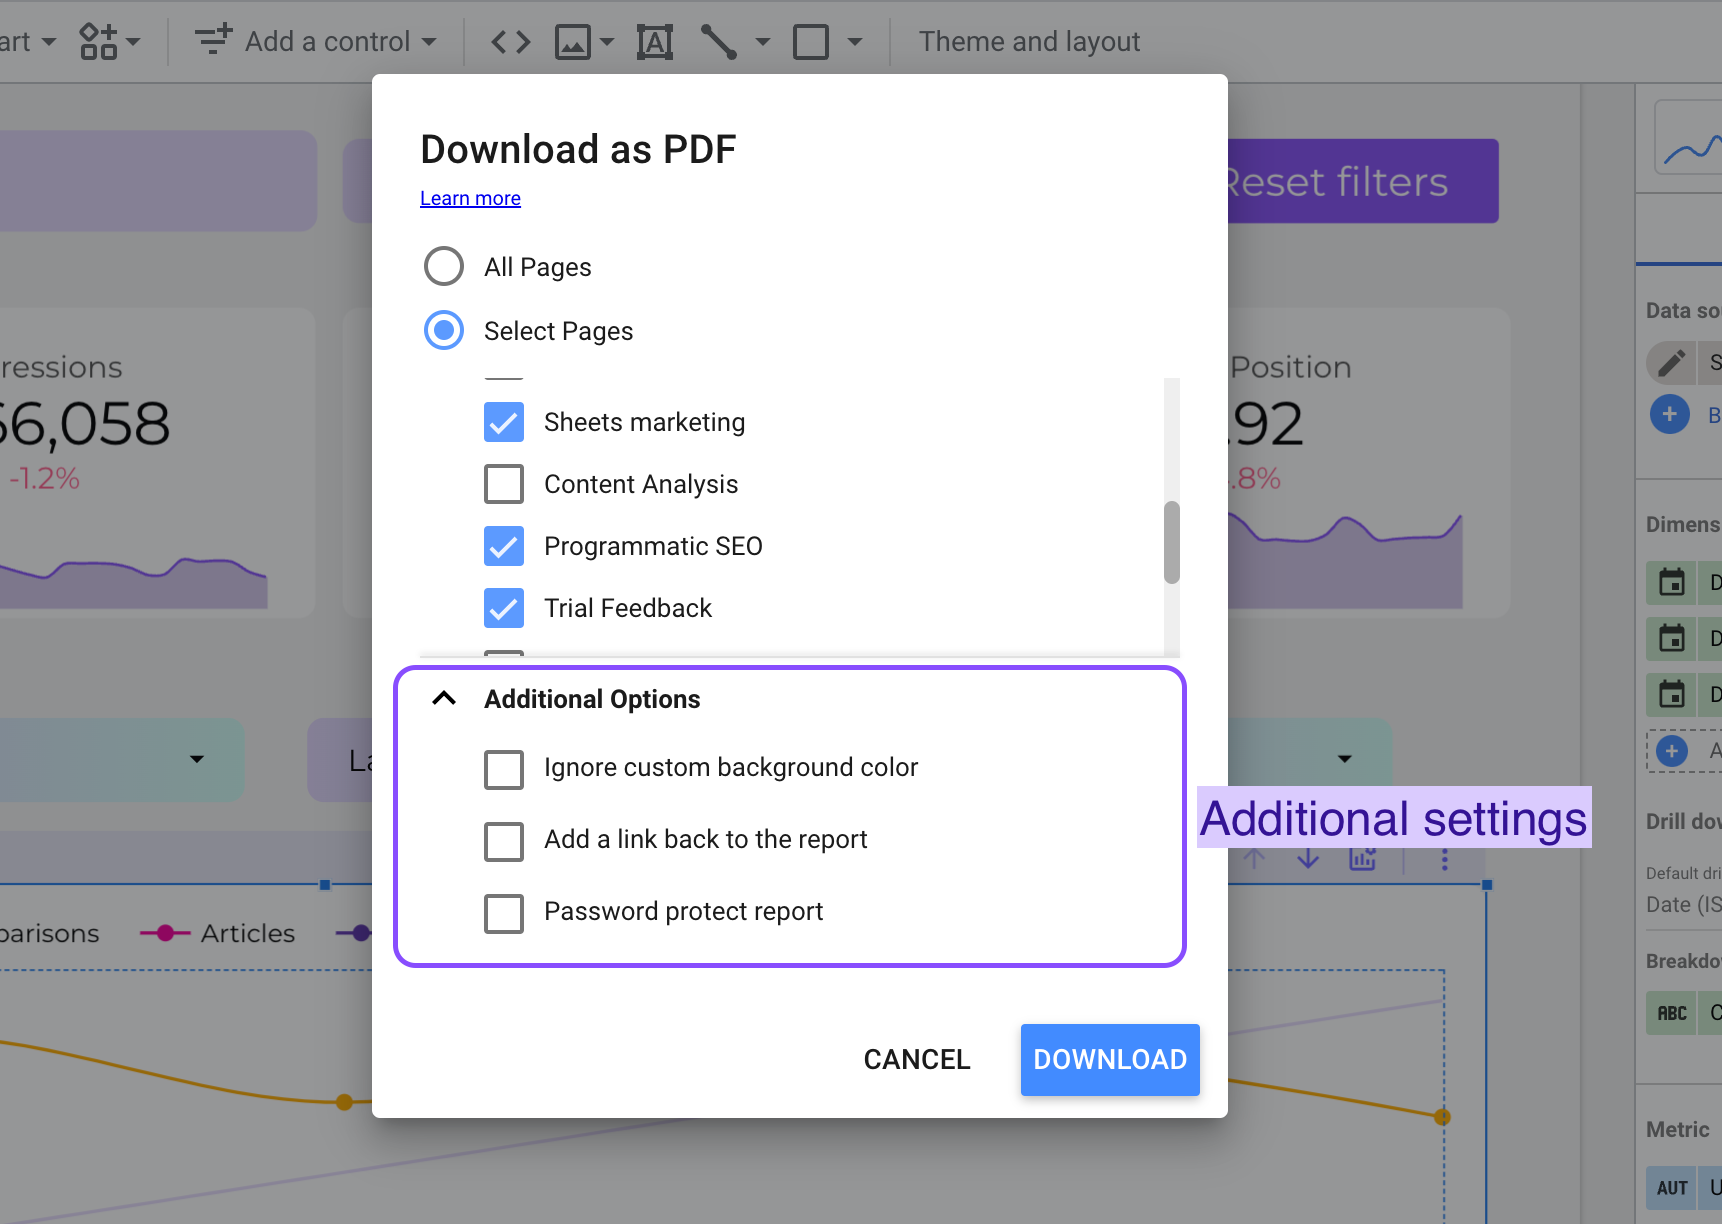
- (Optional) You can also select Additional Options (Ignore custom background color, Add a link back to the report, and Password protect report).
Then, click Download, and the PDF file should be in your default download location.
Embed Report
Google Looker Studio enables you to embed a fully working report on any iframe-enabled website/application or embedded-compatible social media platform.
Here’s how to get the iframe to embed your report:
- First, click the drop-down menu beside the Share button.
- Then, click ‘Embed report’

- After that, check the Enable embedding box to embed a data studio report on a website or app that supports the HTML iframe element.
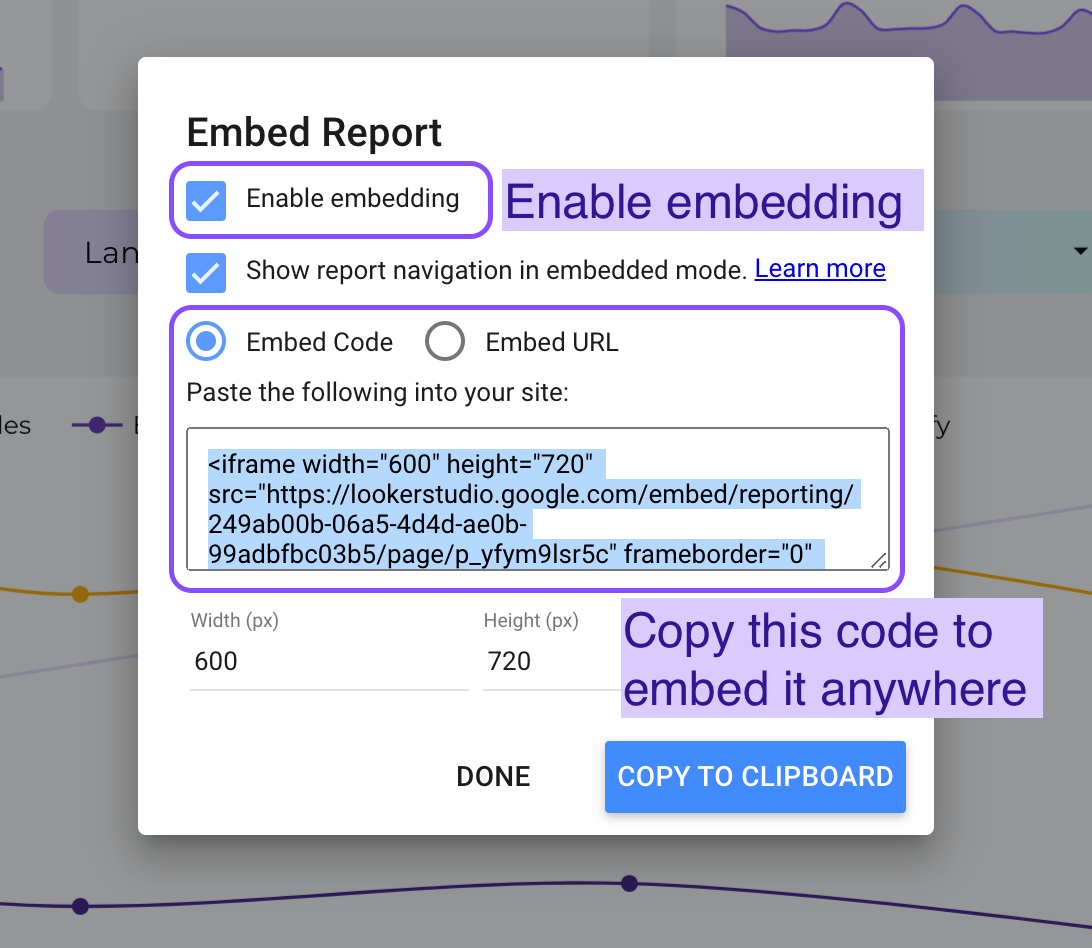
- Now, you can copy the iframe code or URL and embed your report.
- You can also uncheck the Show report navigation in embedded mode if you feel you won’t need it.
- (Optional) You can also specify the width and height in pixels.
- Finally, you can click COPY TO CLIPBOARD and use it in your HTML page or web application.
Keep in mind that each embedded resource will appear on as many pages as you choose. Enabling embedding implies that other people can use your embedded material on their websites.
At this point, I believe you should know how to share Google Looker Studio reports with clients efficiently using the sharing options listed above.
However, you may want to export the report to use in other formats. Read on to learn how.
Before that, you should also check out STEP 10 of a similar tutorial on how to automate your reports in 10 steps with Google Data Studio
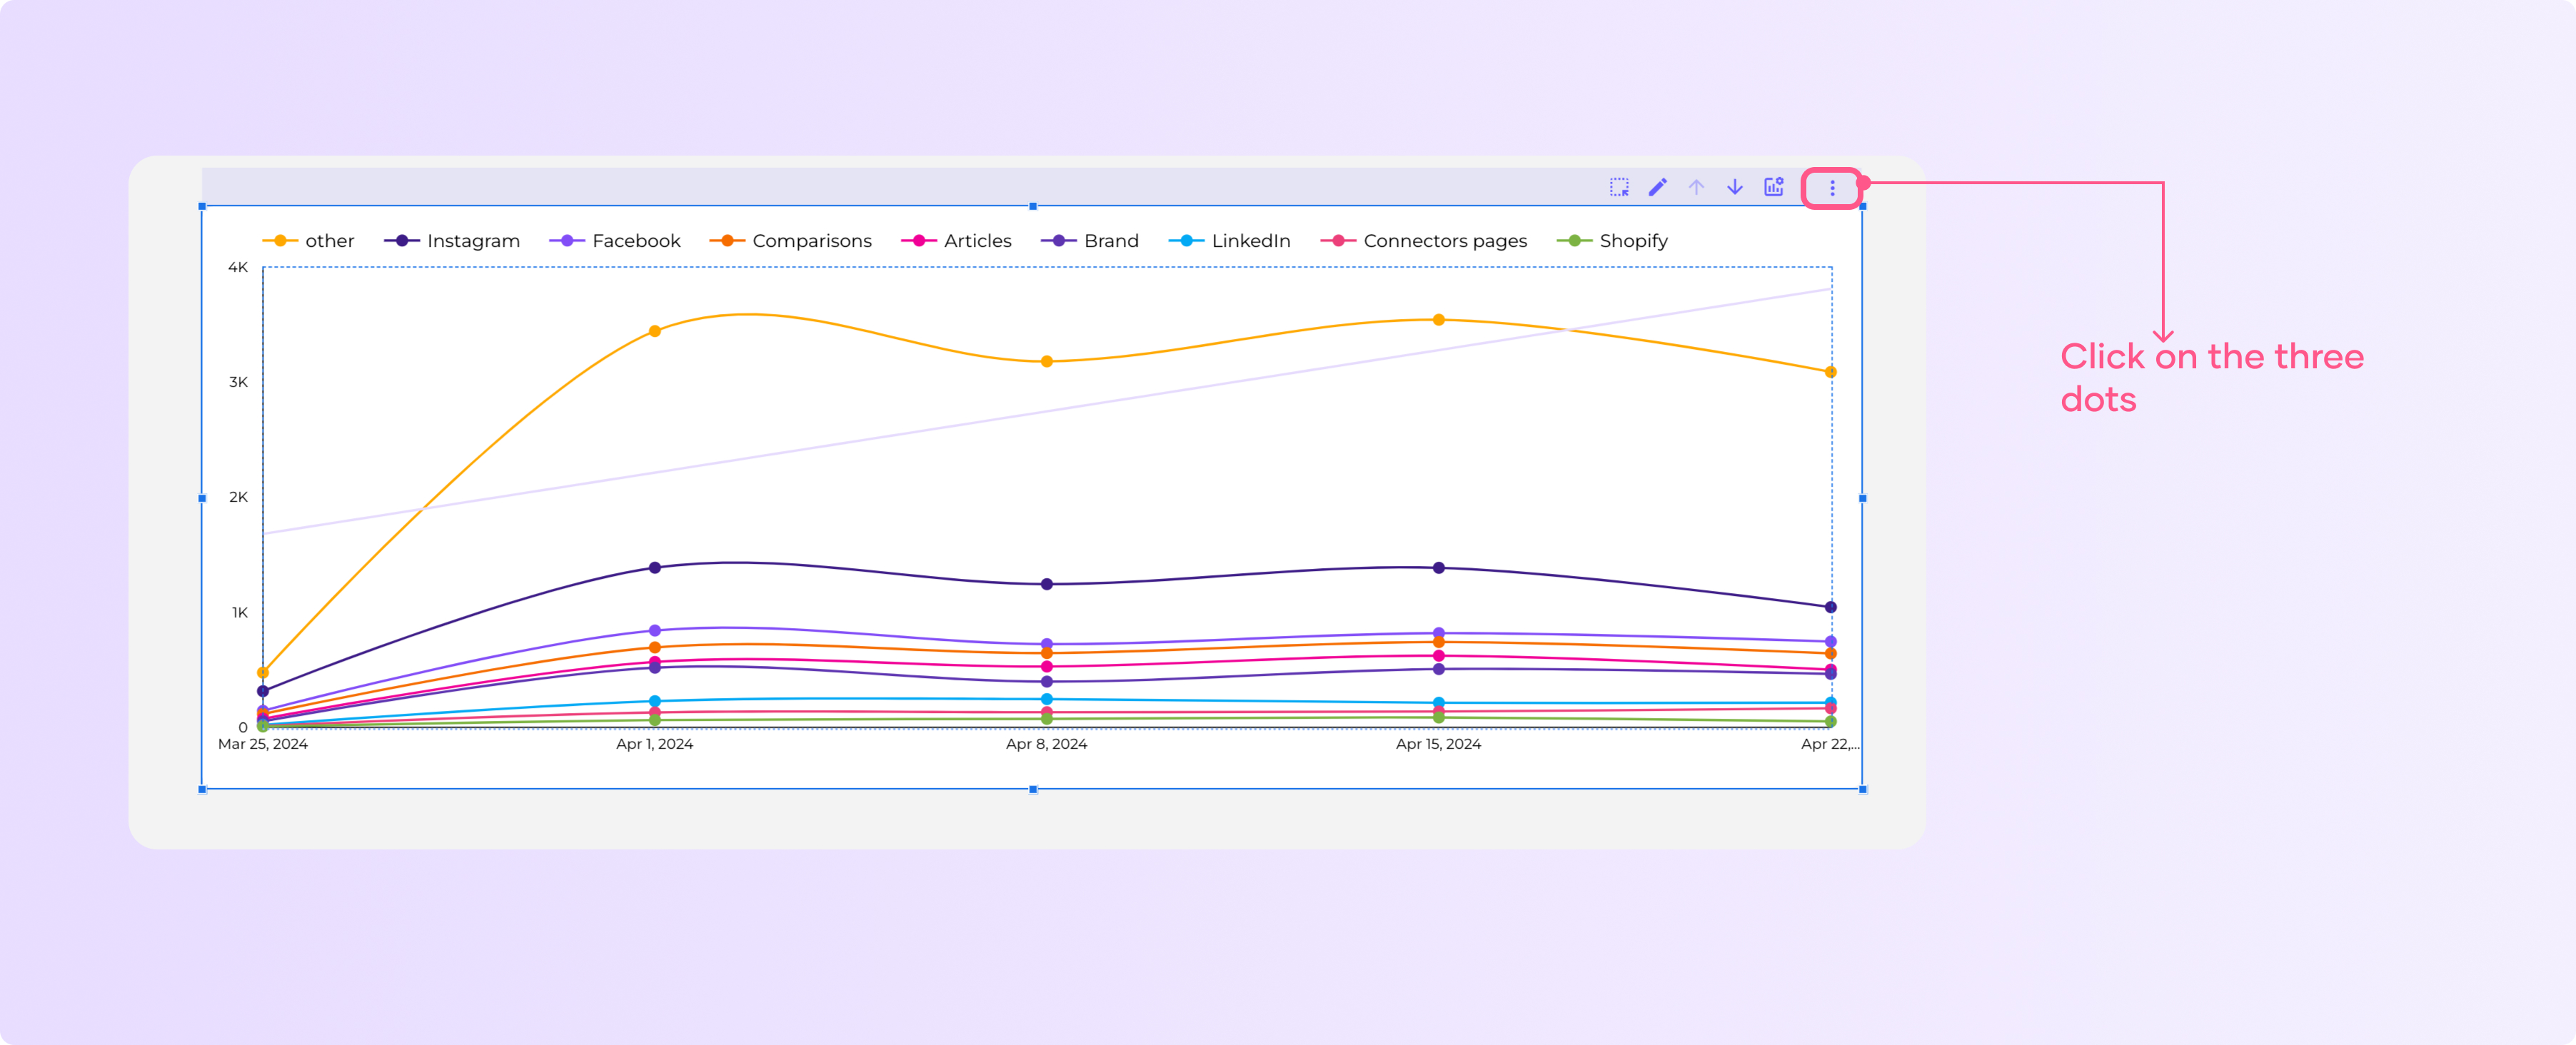
How do I export data from a chart?
When you export a chart’s data, you save it in the file format of your choice. Data export does not save the chart’s picture but rather the data it contains.
Exporting data from a chart is as simple as following the instructions below:
- Place your mouse pointer on the chart you want to export.
- Right-click the chart to choose More options, and then click Export.
- Name your exported data, and you’ll get three Export As options:
- CSV: Generates a text file with comma separation.
- CSV (Excel): Creates a comma-separated text file with non-ASCII characters encoded correctly for use in Excel by using the CSV format.
- Google Sheets: Data is sent immediately to Google Sheets.
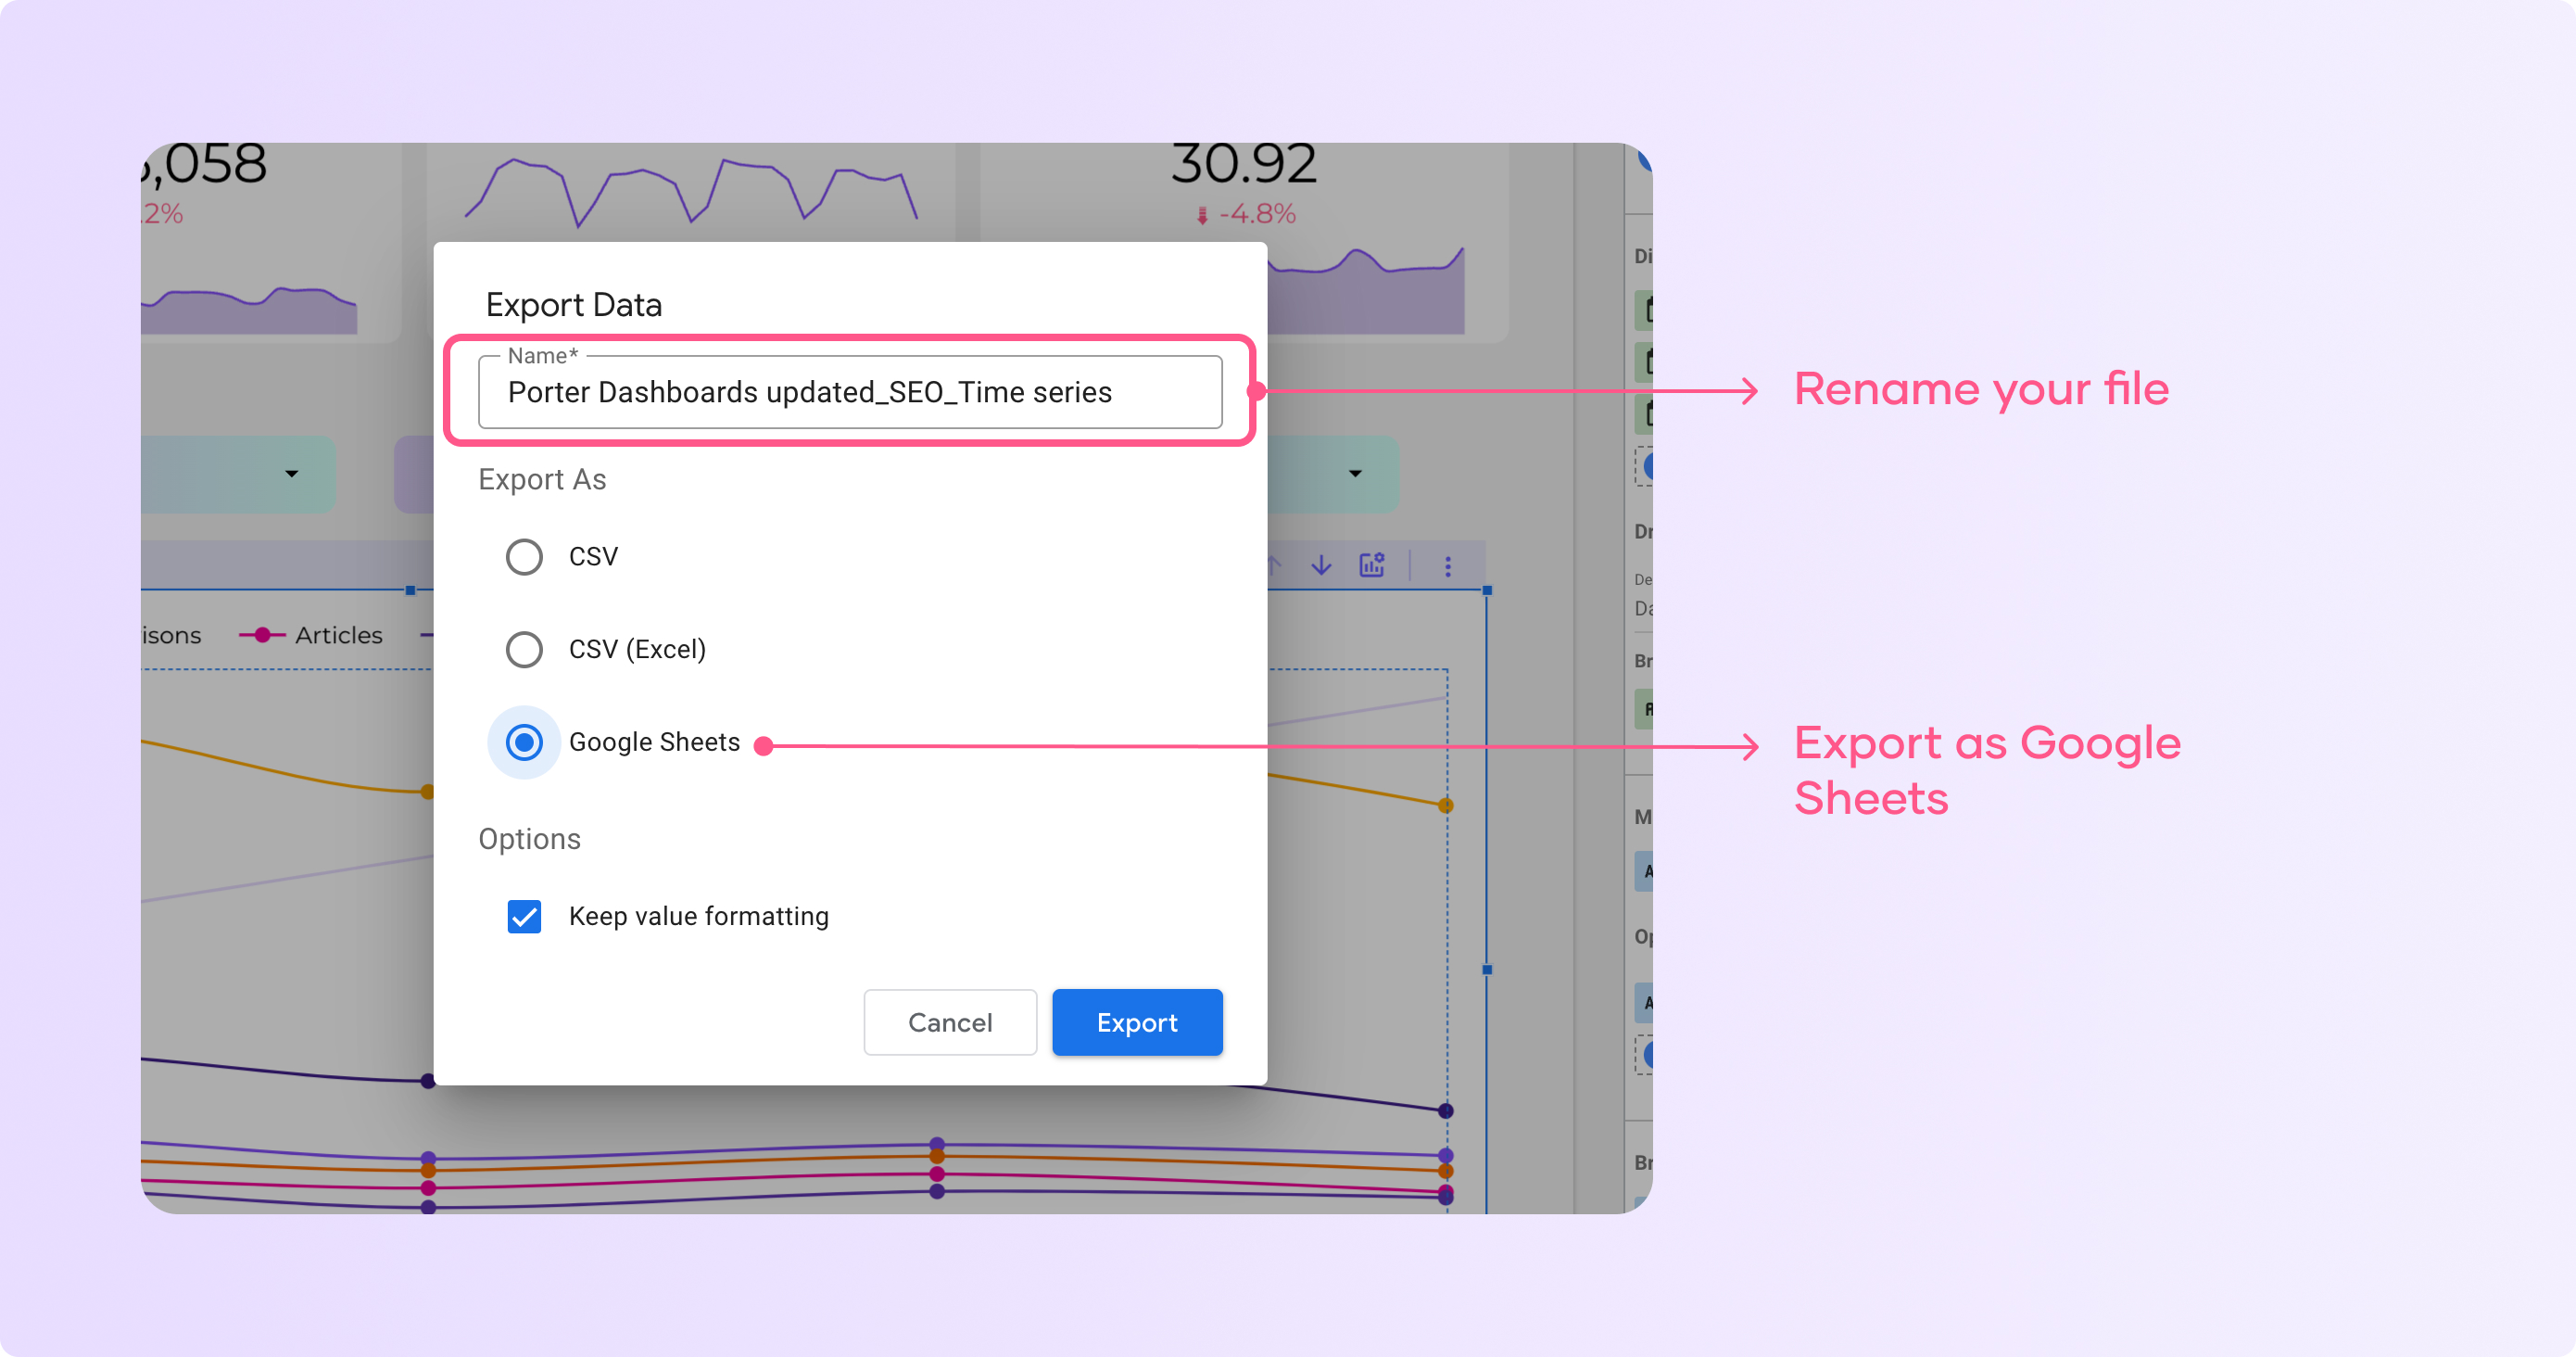
- If you want to export your data with the number and date formats that you applied in Data Studio, click the Keep value formatting checkbox.
- Now, click EXPORT, and the data for the chart will be exported/downloaded in the specified file format.
Report access settings
Report settings allow you to apply certain conditions for anyone with view or editing access permissions.
For instance, you can prevent people with access from downloading your report or copying your report as a template. Let’s see each one and how to use them, to access your report access settings:
Click ‘Share’ on the top right corner of your report
Click on the settings icon in the right corner of the sharing options
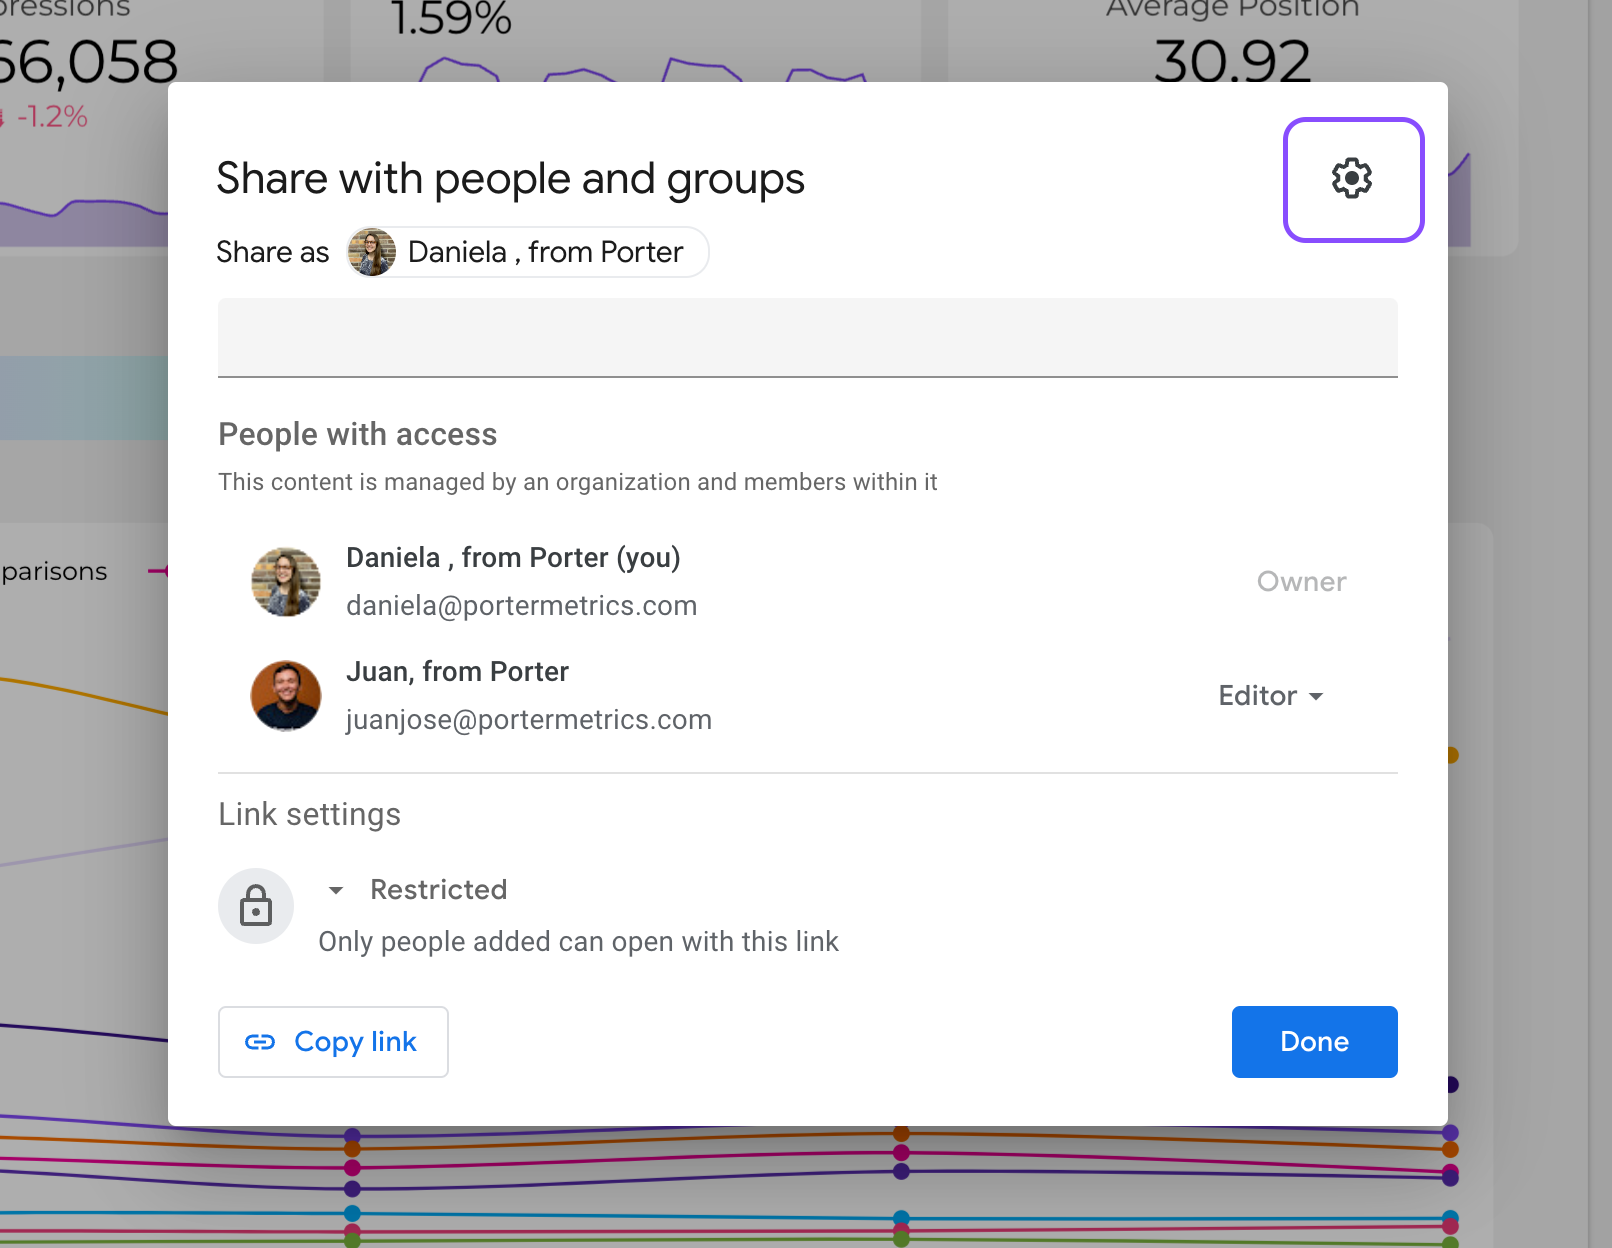
Now you will see three different report access settings you can modify
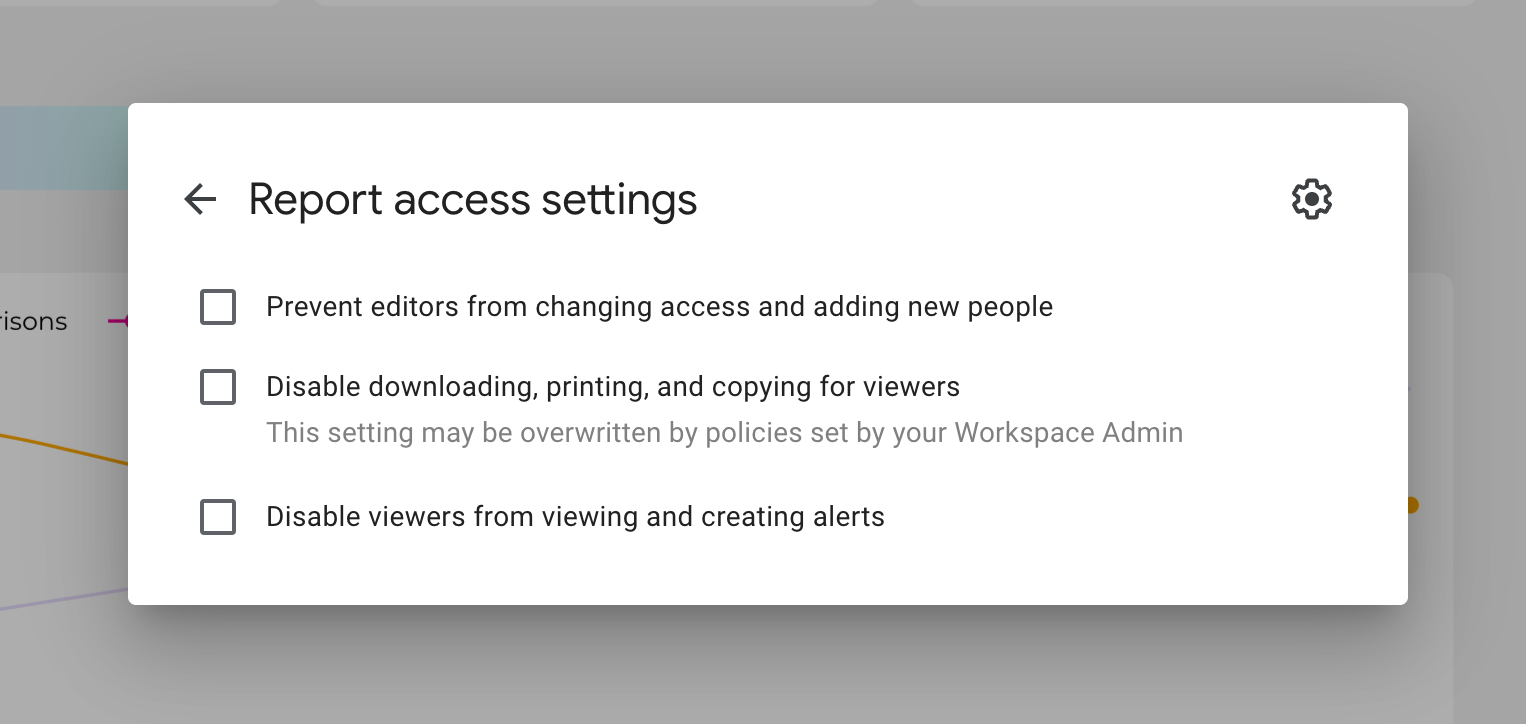
Prevent editors from changing access and adding new people
If you click and save this option, no one except you can modify access or add new people to the report. I recommend using it if you have strict policies regarding data security and access control.
Disable downloading, printing, and copying for viewers
If you don’t want your report to be duplicated, then select this checkbox. People with viewer access can interact with the report, but they can’t download it as a PDF or create a copy.
If you only want to share your report but don’t want anyone to copy it, you should check this box.
Disable viewers from viewing and creating alerts
This applies if you have a Looker Studio Pro subscription and basically won’t allow viewers to create alerts based on certain conditions.
Conclusion
From this article, you must have learned that there are several ways how to share your reports with clients and team members. But as you can see, there are also some minor differences to be mindful of before you begin sharing them.
If you are planning on automating your Google Data Studio report, I recommend you check out Porter Metrics first and make a report
Porter Metrics offers you a no-code platform with free marketing report template galleries, familiar marketing tools and connections, and 24/7 customer support.
You should also know that you’ll be getting a 14-day free trial. If you have any issues with making a report, you can schedule a call to get a free report set up.
Lastly, you should check out our YouTube video on Google Looker Studio: Share Your Reports [Automate it] to learn more about sharing Google Data Studio reports and automating them.
Frequently Asked Questions
How do I make a Data Studio report public?
Follow the steps below to make a Data Studio report public.
- Choose Share from the menu to open the sharing window.
- Then, head to the Manage Access tab.
- Now, choose the Anyone on the Internet can find and view option.
- In the sharing settings, you can also select the Disable downloading, printing, and copying for viewers option.
- Then, click Save to save the changes.
How to create and share a Looker Studio template?
The easiest way to share your report as a Google Looker template is to enable the Link Sharing option.
Follow the steps below to share a Data Studio report so viewers can use it as a template.
- First, choose Share from the menu to open the sharing window.
- Then, head to the Manage Access tab.
- After that, on the Linking Setting options select unlisted or public. This will allow users to see and copy the template.
- You can now copy and share this link with your colleagues. They will have the ability to make a copy of the report and use it as a template for their work.
- Then, click Save to save the changes.
If you want your report to look like a template when you share it add ‘/preview’ to your report link. For instance: https://lookerstudio.google.com/u/0/reporting/45a8c0e4-8513-45e3-93c3-a82c8f416511/page/p_mkh2j3hm6c/preview
NOTE: Verify that the Disable downloading, printing, and copying for viewers box is unchecked.
How do you send a Looker Studio report?
You can send a Data Studio report to a client by scheduling an email address for them to receive it.
Using an email delivery schedule, you can send out report links to clients or coworkers without having to do so manually.
Scheduling reports has proven to be an excellent way to share Google Data Studio reports with clients.
Follow the steps below to send a Data Studio report:
- In the drop-down menu under the Share button, click on Schedule email delivery,
- Then, enter the email addresses of the recipients.
- (Optional) You can also customize the mail subject and message.
- Next, select the pages of your report you would like to schedule email delivery for.
- After that, specify the Start Time.
- Then, select the repeat rate (Daily, Weekly, Monthly, Weekdays, or Custom).
- Last, click Schedule to finalize the automation.